http://www.blogger.com/
Showing posts with label 14 days of valentines. Show all posts

Monday, February 10, 2014

14 Days of Valentines - Day 10

As I mentioned before, I'm getting ready for Easter, so I have a bunch of bunnies lying around. I like simple so here's today's project...

Color up some bunnies and paws. I used the Happy Easter set from dandelion designs. Cut out a bunny and a paw.

Take a piece of cardstock 3.5" x 7.25" and lay it lengthwise across the top of a Martha Stewart Scored Board. Score at the 3" , 3.5" and 6.5" points. Fold at the creases to form a matchbook.

Fill a small treat bag with some candy. Fold the bag up to close. Tuck under the .75" flap and staple as shown. You can staple as shown or staple with the ends on the back.

Whichever way you stapled, use a strip .75" x 3.5" and tape over the ends of the staples to prevent snags, especially if you are planning to give this to children.

Take some pink or red cardstock and punch out three 1.5" hearts using the Marvy Uchida heart punch - yellow.

On the hearts, write "Some" Bunny" "Loves U".

Putting it all together - Place the "Some" and "Bunny" hearts along the side and tape to the cover. Use foam pop dots to adhere the bunny. Place the "Loves U" heart on the bunny and add the paw on top so it looks like the bunny is holding the heart.

This is a fast an easy project that you can use your scraps for. Thanks for stopping by today and have a great week!

Saturday, February 8, 2014

14 Days of Valentines - Day 8

Are you starting to  wonder what you're going to eat for Valentine's dinner..hmmm maybe Japanese? Well, today's project would be perfect for that!

All you need is a square sheet of paper 4.75" x 4.75". I found this cute heart print wrapping paper at the Celebrations store. Take the paper and fold it into thirds.

I usually roll it into thirds and pinch the ends to mark where I have to fold. Then, I refold it and crease it nicely. Unfold.

Fold the bottom right corner to the center, crease well.

Repeat with the left bottom corner. Unfold.
 
Fold in the bottom right  corner to the creased line. Crease well.

Repeat with the left corner.

Fold the right side flap in and align to the one-third crease fold. Crease well.

Repeat with the left side flap.

Fold in the bottom right corner to the center. Crease well.

Repeat with the left bottom corner. Crease well. You can see the heart taking shape now.

Turn the whole piece over.

Fold in the right side to the center. Crease well.

Repeat with the left side.

Turn over. Now, you can really see the heart shape.

Pick the piece up and tuck the straight edge into the back of the heart.

Ta Daa! Your heart is complete! What's it for?

It's a chopstick rest!

Although you think there are a lot of steps because of the number of photos, there really isn't. I just like to show the before and after each step. Thanks for stopping by today and hope you're having a Fun Saturday! Hmmm...maybe I'll have Japanese food tonight?

Wednesday, February 5, 2014

14 Days of Valentines - Day 5

Today is the fifth day in this series of 14 Days of Valentines. Yesterday, I used Plarn to tie up one of the gift card holders. So, you ask what is Plarn? Well, today is your lucky day, we're going to make a Plarn-ation!
Okay, I made that word up. We're going to make a carnation flower from Plarn, which is like a yarn made from plastic that's super strong. A Plarnation would be great for outdoor decorations and fun for Graduations, too. They are simple to make. Choose your color of Plarn, it comes in 6 colors: White, Red, Pink, Blue, Yellow and Green. I'm going to use two colors, the red and pink.

It's going to be just like making a pom pom. Take a piece of sturdy cardboard about 3" wide. First, wrap the pink plarn in the middle of the cardboard about 20 times.

Then, take the red plarn and wrap it around the cardboard left to right about 80 times.

I took  12" of the red plarn and slid it under one side of the wrapped plarn, like when you make a pom pom.

Tie the piece of plarn up, bundling the wrapped plarn. Tie it  as tight as you can and knot it two times to secure. Slide the cardboard out.

Cut apart all of the loops of plarn.

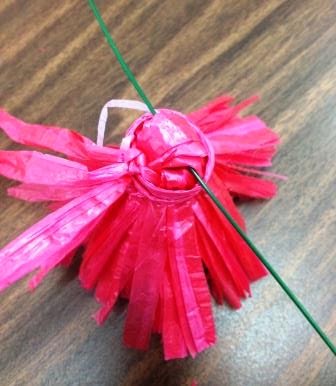
The pink plarn should be in the center,  just to give it some contrast. You can even trim this section shorter to make it stand out more. Shape the flower by fluffing the strands and trimming the ends as needed.

Take a 12" length of the red plarn and wrap around the bottom, tie securely.

Slip an 18 gauge floral wire through the bottom of the bundle. Fold the wire in half for the stem.

Place 5 satin leaves along the bottom to make a calyx. Glue in place, slightly overlapping each other.

Wrap up the stem with floral tape. Start the floral tape about 1" below the calyx. Wrap upwards to the calyx. Then, work your way back down to the end of the stem. Remember that you need to pull the floral tape slightly as you wrap to release the adhesive in the tape.
You can add leaves to the stem as you wrap it with the floral tape.

Fluff and shape the "plarnation" until you're happy with it. One roll of plarn can make a lot of flowers!

Although roses are generally associated with Valentine's Day, carnations always have a special place in my heart for that day. In my sophomore year (our first year of high school), my group of friends included four girls (my besties!) plus a couple of guys. We always hung out together and none of us were "couples". But on Valentine's Day, the guys surprised us! They each gave us girls a single stem rose and some carnation stems. It must've made them broke going to the florist near our school! So, we carried our flowers around all day, class to class. It was really sweet of them to make us all feel so special! Carnations take me back to those sweet memories.

Thank you for stopping by today and I hope your week is going great!

Monday, February 3, 2014

14 days of Valentines - Day 3 Funny Little Valentine!

Welcome back! Today's project, the third in the 14 Days of Valentines, is for the fun at heart!

It's time to make some Happy feet!

Start with an inexpensive pair of rubber slippers.

Grab some balloons. I chose red, white and pink to match our Valentine's theme. I separated all of the balloons into two piles and laid them out in a color repeat pattern.

Then, I started from the middle and tied a balloon onto the strap.

Then, I continued to tie all of the balloons onto the strap. One pile of balloons per slipper.

Look how fun these pair of slippers are now! You need to be careful, because someone may leave your house with them because they are so crazy fun! I once made a pair using an assorted color pack of smaller water bomb balloons. It was a fun summer wearing those slippers around. This is an easy project for kids to do, too!

Thanks for stopping by today and I hope I spock some balloon slippers around town! LOL!

Sunday, February 2, 2014

14 Days of Valentines - Day 2

Welcome Back! It's Super Bowl Sunday, which for me means a great time to craft. Occasionally, I watch the game and cheer for a team but usually I just like watching the commercials! LOL!

So, for Day 2, I'm sharing a project that Beth from Mapunapuna Ben Franklin Crafts will show you how to make on tonight's Joy of Crafting Show. I call it the Framed Scripted Heart.

Beth created her own heart cut out to use as a stencil. She placed it over the black cardstock and used a white ink pen to write words of love in the cutout area. When she removed the stencil, it left a wonderful scripted heart. For a special effect, she re-traced the words in Glossy Accents to make the heart standout even more.

What a great idea for anytime of the year, not just Valentine's day.

Thanks for stopping by today and scroll down to my earlier post to find out more about tonight's show. Happy Crafting!

Thursday, February 14, 2013

14 Days of Valentines - I Love You!

Been cold these past few nights, mmm this would be so good!
Thanks for following along with the 14 Days of Valentines! I really appreciate your patience as I was having problems with my post scheduling. And because of your kindness, I LOVE YOU, even more!

So, for those three little words, I am going to give away three Ben Franklin Crafts gift cards. All you have to do is leave a comment and tell me three things:

1) Of the 13 projects I posted, which was your favorite.

2) What is your favorite type of craft to make

3) How often do you craft?

So, since I know a lot of you have special plans for tonight (maybe the whole weekend?!), everyone has until Tuesday, February 19, 12 noon Hawaii Time to leave their comment. We will randomly pick three winners from all the comments and we'll announce the winners on Tuesday at 5pm.

Thanks for stopping by today and hope you all have a really special weekend!

14 Days of Valentines - Day 13 Confetti Heart

I guess you gotta have some chocolate for Valentine's Day, right? Here's a simple candy you can make yourself in just a few minutes!

You'll need some Melt 'n Mold chocolate, a heart cookie cutter, some confetti sprinkles, wax paper, a flat plate or tray and something to melt the chocolate in. I use the Wilton disposable clear decorating bags and a glass bowl or jar. You'll also need a refrigerator.

Take one bag and put some chocolate in. Place the bag in a bowl or jar as I did and melt in the microwave. I start with just 20 seconds to see if it is melted. The time depends on how much chocolate you are melting at a time and your microwave. It is better to microwave in short intervals than to overmelt your chocolate.

Place some wax paper onto a clean flat plate or tray. Place your cookie cutter onto the wax paper.Cut the tip of the bag and squeeze the chocolate into the cookie cutter without moving the cutter.

Smooth out the surface.

Add your confetti sprinkles.

Place the chocolate filled heart into the refrigerator or freezer for a few minutes to harden the chocolate. Pop the chocolate out of the cookie cutter. Place in a small bag or a box to give as a gift.