http://www.blogger.com/
Showing posts with label paper crafts. Show all posts

Thursday, February 13, 2014

14 Days of Valentines - Day 12

For the 12th project in the 14 Days of Valentines, I'm playing with another new toy! I loved the We R Memory keepers envelope Punch Board, well now, they have a couple of new punch boards that make all kinds of favors!
 
Today, I'm going to use the Pillow Box Punch Board!
 
Got some pretty cardstock and sheer ribbon.
 
You need to cut the paper 6" wide and you can make it anywhere from 4" to 12" long. I decided on 6" long. Take the cardstock and align the left side to the "Start line" printed on the board in green.

Punch and score the curve along the top. Score the vertical line on the right side edge.

Move the cardstock over to the left and align the top along the "Nook".

Punch and score again. Move the cardstock to the left again and punch and score the curve. Flip the cardstock around and punch and score the other side

Flip the punch board and insert the middle tab into the reverse punch to make the notch.

Trim off along the curve of the side tab.

Crease and put double stick tape along the tab section.

Assemble the box.
 
I tied a ribbon around the box and made a bow.

Here's a 4" size box. It's perfect for some fine jewelry, hint, hint!
 
These Punch Boards really make it easy to whip up some great gifts! There's also a bag and candy favor box punch boards.
 
Thanks for stopping by today and don't forget to check out the blog on Valentine's Day for our contest! You could win a Ben Franklin Crafts gift card!


Monday, February 10, 2014

14 Days of Valentines - Day 10

As I mentioned before, I'm getting ready for Easter, so I have a bunch of bunnies lying around. I like simple so here's today's project...

Color up some bunnies and paws. I used the Happy Easter set from dandelion designs. Cut out a bunny and a paw.

Take a piece of cardstock 3.5" x 7.25" and lay it lengthwise across the top of a Martha Stewart Scored Board. Score at the 3" , 3.5" and 6.5" points. Fold at the creases to form a matchbook.

Fill a small treat bag with some candy. Fold the bag up to close. Tuck under the .75" flap and staple as shown. You can staple as shown or staple with the ends on the back.

Whichever way you stapled, use a strip .75" x 3.5" and tape over the ends of the staples to prevent snags, especially if you are planning to give this to children.

Take some pink or red cardstock and punch out three 1.5" hearts using the Marvy Uchida heart punch - yellow.

On the hearts, write "Some" Bunny" "Loves U".

Putting it all together - Place the "Some" and "Bunny" hearts along the side and tape to the cover. Use foam pop dots to adhere the bunny. Place the "Loves U" heart on the bunny and add the paw on top so it looks like the bunny is holding the heart.

This is a fast an easy project that you can use your scraps for. Thanks for stopping by today and have a great week!

Saturday, February 8, 2014

14 Days of Valentines - Day 8

Are you starting to  wonder what you're going to eat for Valentine's dinner..hmmm maybe Japanese? Well, today's project would be perfect for that!

All you need is a square sheet of paper 4.75" x 4.75". I found this cute heart print wrapping paper at the Celebrations store. Take the paper and fold it into thirds.

I usually roll it into thirds and pinch the ends to mark where I have to fold. Then, I refold it and crease it nicely. Unfold.

Fold the bottom right corner to the center, crease well.

Repeat with the left bottom corner. Unfold.
 
Fold in the bottom right  corner to the creased line. Crease well.

Repeat with the left corner.

Fold the right side flap in and align to the one-third crease fold. Crease well.

Repeat with the left side flap.

Fold in the bottom right corner to the center. Crease well.

Repeat with the left bottom corner. Crease well. You can see the heart taking shape now.

Turn the whole piece over.

Fold in the right side to the center. Crease well.

Repeat with the left side.

Turn over. Now, you can really see the heart shape.

Pick the piece up and tuck the straight edge into the back of the heart.

Ta Daa! Your heart is complete! What's it for?

It's a chopstick rest!

Although you think there are a lot of steps because of the number of photos, there really isn't. I just like to show the before and after each step. Thanks for stopping by today and hope you're having a Fun Saturday! Hmmm...maybe I'll have Japanese food tonight?

Tuesday, February 4, 2014

14 Days of Valentines - Day 4

Today, I'll share project 4 of the 14 Days of Valentines. We're going to play with one of my new favorite toys, the We R Memory Keepers Envelope Punch Board!

Besides making envelopes for greeting cards, this tool helps you whip up Gift Card holders really fast. It's a really great project for scraps or those cute 6 x 6 paper pads.

Basic instructions are printed right on the board. So, for my gift card holders, I'll need a 5" x 5" paper.

I'm going to use some papers that aren't "Valentine's Day" but they have that feel in their designs.

The instructions say to line up the edge at the "2" mark.

I press down that big blue button which is the punch for the corners of the envelopes. Next, you score using the scorer that comes with the board.

You rotate the paper counter clockwise and line up the first scored line with the point protruding from the punch towards the left. Score the next side. Repeat until all sides are scored and punched.

It should look like this.

If you want to round the points, turn the board around and place your corner into the other side of the punch. Punch down to round the points.

Here's the rounded point.

Fold up at the scored lines. Fold in the sides and use tape or glue dots.  Fold up the bottom to make the envelope.

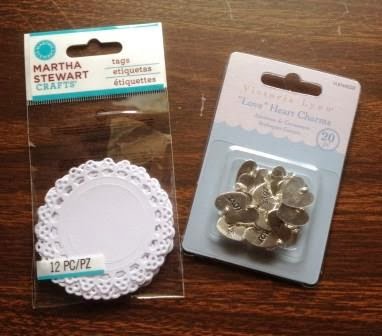
I used some Martha Stewart mini doilies and some metal "love" tags from the wedding department to embellish.

I slipped in a Ben Franklin Crafts gift card.

I decided to tie up the gift card holder with baker's twine and tied on the "love" tag.

I used Plarn to tie up this holder.
 
These mini gift card holders are also the perfect size for tiny love notes. You can also just fold them up an tie it closed,  that way they can open up completely and reveal your secret message!

Hope you're having fun with these simple heart felt projects. Thanks for stopping by on this rainy and soggy day!Happy Crafting!