Hello February! Last year, I did 14 Days of Valentine's projects and I decided to do it again this year! To refresh your memory, these are the projects I shared last year ...
I know you only count 13 projects because on Valentine's Day, I asked what was everyone's favorite project?! A lot of people picked as their favorites the Message in a Bottle, the Origami Heart and the Wire Wrapped Heart ring. Then, I randomly chose 3 comments and gave those people a Ben Franklin Crafts gift card. I plan to do the same thing this year!
You can read more about last year's projects beginning from
Day One here.
So, for this year's first project I have a punch art project, hope you like it!
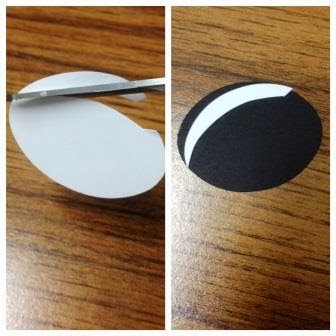
Most of the punches used are Marvy Uchida Clever Lever punches unless specified. Start with the 2.5" Oval - Pink and punch out an oval in white cardstock and one in black cardstock. Take the white oval and slip it back into the punch and punch out a section on each side, as shown.
Next, take EK Success 5/16" circle punch and punch two circles on a scrap piece of white cardstock.
Now, take the Clever Lever 1/2" circle punch - Orange, and position over the 5/16" holes as shown and punch out. These are your eyes.
Take the 2" Oval - Blue punch and punch out two ovals from black cardstock. Keep one on the side for the body.
Slip the other oval back into the punch as shown and punch a skinny oval. Cut this piece in half for the ears.
Take the 5/16" punch and punch out one circle from pink cardstock for the nose. Assemble all of the punched pieces and glue as shown. The black from the head will show through to create the eyes. Use the white Galaxy Marker to make a dot in the eyes for highlights.
Take the 2" Oval - Blue punch and punch out one oval from white cardstock. Use a scissors to trim off a section along the top. Glue onto the body for the "back stripe".
Slip the same white oval back into the punch as shown and punch out a slight teardrop shape for the chest. Glue in place.
Use the Small Oval - Orange punch and punch out four ovals from black cardstock for the paws. This is not shown, but use the 1.5" Heart - Yellow punch and punch one heart from red cardstock. Use a black marker to write "Be Mine" on the heart.
Use the 2.5" Oval - Pink punch and punch out one oval from white cardstock and one from black cardstock. Place the black oval back into the punch and punch out a skinny oval. Do the same with the white oval, but make it smaller. Layer the white onto the black and glue. This is the tail.
Assemble all the pieces together to make your skunk. I have two small black ovals at the bottom for the feet and the two other small ovals are the paws holding the heart. I placed the skunk on the front of a card and used stickers to write" UR so Stinkin' Cute!"
Thanks for stopping by today! Hope you're enjoying the weekend! See you tomorrow for another heart-felt project!