http://www.blogger.com/
Showing posts with label punch art. Show all posts

Monday, July 11, 2016

Make It Monday! - Fruity Book Clips

This is the last week for the Hawaii State Public Library's Summer Reading Program. This was our third year participating in the program by going to the libraries and demonstrating hands-on Hardware Science as well as some crafts.

Because this year's them was Health and Fitness, we decided to make Fruity Book Clips! They are super easy to make and are also great for you planner girls!


We had apples or watermelons to make using circle punches. For an apple, punch a 2" red circle and a 1.5" cream colored circle.


Fold both in half. Then, open up the cream colored circle and use a glue stick to add glue.


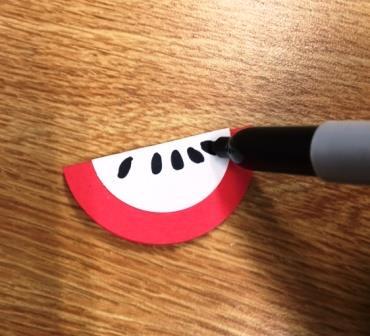
Place the cream colored half over the red half circle and glue together. Next, take a marker and draw seeds or a face on both sides.


Lastly, take a pop up glue dot and stick it on the end of a jumbo paperclip.


Place the clip inside of the apple and press together. Now, you have a clip to use as a bookmark.


To make the watermelon, punch a 2.5" circle from green and a 2" circle from pink. Follow the same steps as the apple to assemble.

We really enjoy going to the libraries and meeting all of the families. Here is what Hardware Science looks like...

Upside Down Fountain!


Inertia Cup Challenge!
Lining up to do Straw Rockets
Aim for the Fruit!
 
Thanks for stopping by today and I encourage you to check out the public libraries, there's lots to see and do there!

Tuesday, July 21, 2015

The second show for July

The current show is the second one for July. It has a nice variety of crafts with some of our favorite crafters!

We start the show with Devin "Ducky" Nakasone and Sharlene Aoki from Prayers on Wings. If you remember Devin's first appearance on the show, he shared his personal inspiration for POW. 
 
This time, Devin shares his brand new book and to celebrate , we make special ducky bookmarks. You can learn more about Prayers on Wings, here.

Next, Gloria from Pearl City BFC shows us her twist on the hot trend of flower crowns. She adds yarn and makes a Mermaid version!

Then, we have Julie from Enchanted Lake BFC shows us a cool resin project, sushi magnets! They look so ono!

Thanks for stopping by today and I hope you're having an awesome summer!

Saturday, February 1, 2014

14 Days of Valentine's - Day 1 Punch Art Card

Hello February! Last year, I did 14 Days of Valentine's projects and I decided to do it again this year! To refresh your memory, these are the projects I shared last year ...

 
I know you only count 13 projects because on Valentine's Day, I asked what was everyone's favorite project?! A lot of people picked as their favorites the Message in a Bottle, the Origami Heart and the Wire Wrapped Heart ring. Then, I randomly chose 3 comments and gave those people a Ben Franklin Crafts gift card. I plan to do the same thing this year!
 
You can read more about last year's projects beginning from Day One here.
 
So, for this year's first project I have a punch art project, hope you like it!
 
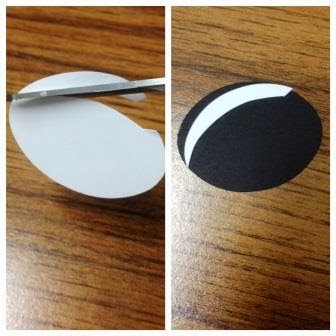
Most of the punches used are Marvy Uchida Clever Lever punches unless specified. Start with the 2.5" Oval - Pink and punch out an oval in white cardstock  and one in black cardstock. Take the white oval and slip it back into the punch and punch out a section on each side, as shown.
 
Next, take EK Success 5/16" circle punch and punch two circles on a scrap piece of white cardstock.

Now, take the Clever Lever 1/2" circle punch - Orange, and position over the 5/16" holes as shown and punch out. These are your eyes.

Take the 2" Oval - Blue punch and punch out two ovals from black cardstock. Keep one on the side for the body.
Slip the other oval back into the punch as shown and punch a skinny oval. Cut this piece in half for the ears.

Take the 5/16" punch and punch out one circle from pink cardstock for the nose. Assemble all of the punched pieces and glue as shown. The black from the head will show through to create the eyes. Use the white Galaxy Marker to make a dot in the eyes for highlights.

Take the 2" Oval - Blue punch and punch out one oval from white cardstock. Use a scissors to trim off a section along the top. Glue onto the body for the "back stripe".

Slip the same white oval back into the punch as shown and punch out a slight teardrop shape for the chest. Glue in place.

Use the Small Oval - Orange punch and punch out four ovals from black cardstock for the paws. This is not shown, but use the 1.5" Heart - Yellow punch and punch one heart from red cardstock. Use a black marker to write "Be Mine" on the heart.

Use the 2.5" Oval - Pink punch and punch out one oval from white cardstock and one from black cardstock. Place the black oval back into the punch and punch out a skinny oval. Do the same with the white oval, but make it smaller. Layer the white onto the black and glue. This is the tail.

Assemble all the pieces together to make your skunk. I have two small black ovals at the bottom for the feet and the two other small ovals are the paws holding the heart. I placed the skunk on the front of a card and used stickers to write" UR so Stinkin' Cute!"

Thanks for stopping by today! Hope you're enjoying the weekend! See you tomorrow for another heart-felt project!
Tuesday, November 19, 2013

November's second Joy of Crafting Show

We're right in the middle of the Holiday crafting season and we've got a show with some fun ideas!

Our first guest is Kari Foteff from Strathmore, the people who make all of those great artist paper pads. Here she shares a new item, Artist Tiles. Perfectly square paper pads for your favorite media.

Then, we have Deborah Irvin back from Market City BFC. Deborah dresses up a cute wreath for Santa's Helpers!

Lastly, I'll show you how to make a simple Santa favor box. You make it with mostly punches and it's perfect for parties or little co-worker thank yous. Here's the project sheet.

Thanks for stopping by today and have a great week!