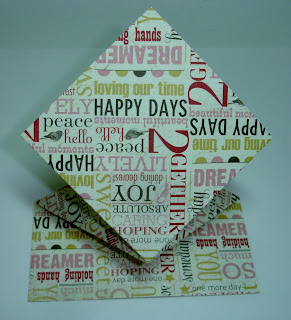
I promised I would post the how-tos for the Stand Up Pop Up card ( I really don't know what to call it) so here it is:
Start with a 10.5" x 5 .25" printed cardstock for the card base.

Fold in half and crease well. Unfold.
Fold one side to the center fold line and crease well. Unfold.
Take the other side of the card and fold down, lining up the top edge along the new fold line you created. Crease well. Unfold.
Now, fold the same way except fold the card upwards, lining the bottom edge along the fold line. Crease well and unfold. You should see an "x" created by the folds.
Now, we need to square off the top of the card. You can measure it out but I made a square template to slide along the folds. It took me two tries and the measurement is weird. It is right between 3 10/16" and 3 11/16". I kind of eye balled it and made a square.
Butt the square up next to the crease lines. The top and sides of the diamond should be at the edge of the cardstock.Trace the edges and cut off the two corners.
The card base is made, now to embellish!
Here's how we made the ribbon rose. Take a XXL Glue dot (2") and remove one of the protective sheets.
Take about 3/4 - 1 yard of 7/8" satin edge sheer ribbon. Make a knot on one end of the length of ribbon, don't have to make it really tight. Trim off excess leaving a short 1/4" tail.
Place the knot with the tailside down onto the center of the glue dot.
Slowly twist the ribbon and tack down to the dot.
Continue this method going around the glue dot until you've reached the edge.
Trim the excess ribbon down to about a 3/4" tail.
Slowly peel the rose off of the protective sheet. Tuck the ribbon tail underneath the flower. Position your flower on your card and glue down. When you are gluing it down, it will seem flexible so you can squish it together more to fluff up your flower.
We finished it off by adding some leaves made by punching green cardstock with McGill's Paper Blossom Star Lily punch.
Then, we added a little tag with a sentiment, we used the backside of a scrap from the card and dandelion designs stamp"thinking of you". Lastly, tied a bow from brown satin ribbon.
Around the make 'n take table, we talked about how we could use this card for different occasions, like adding a photo for graduation, Christmas or a wedding. Or even adding those little stick-on calendars. Making this a card that the receiver can display all the time.
Thanks for stopping by today and I hope you have a great week!

.jpg)


TFS - this is really pretty, love the ribbon rose....
ReplyDeleteyour rose came out so pretty! mine doesn't look like that when i try!
ReplyDeleteThanks Joy! Gotta get me some of that 2" glue dots!
ReplyDeleteThanks for this tutorial. I love the pop up card and I'm glad you are sharing the instructions. The ribbon rose is so pretty. I hope I can duplicate it.
ReplyDelete