http://www.blogger.com/

Wednesday, January 18, 2012

Enter the Dragon!

This one is for Lynn .In December, I shared a couple of favors I made using my favorite Accu Cut Cake Slice box. Lynn challenged me to come up with a Dragon for 2012. I finally made one up, just in time for Monday's Chinese New Year. Enter the Dragon...

Start with an Accu Cut Cake Slice box and place the opening side on the bottom.

Punch out the piece for the head using the purple Clever Lever Oval.

Punch out the nose using the blue Clever Lever Oval.

Use a 1/4" hole punch and make two holes. Adhere some black cardstock behind to create the nostrils.Place this piece along the bottom of the head.

Punch out two circles on a piece of white cardstock using the 5/8" circle punch (light orange).

Center the cut out circles in the 1" circle punch and punch out.

Punch out two black cardstock circles with the 1" punch. Place behind the cut out white circles and adhere together to make the eyes.Place the eyes above the nose and adhere to the head.

Use the light orange oval punch to make two ovals. Place behind the top of the head for the ears and adhere.

I free-hand cut out the little tufts of hair. Adhere to the sides and top, coming out from behind the head.

I also free-hand cut the "whiskers" in yellow cardstock. Adhere near the nostrils and on top of the head.You can also punch out one more purple oval and adhere to the back of the head to hide all of the cut-out ends on the back of the head.

Use the pink Clever Lever oval punch to punch a piece for the belly. Use a black marker to draw some horizontal lines across. Adhere to the lower half of the cake slice box.Place the head above the belly and adhere to the cake slice box with pop up glue dots.

Adhere two stars at the bottom of the box for the feet. Cut two 3/8" x 2" strips for the arms. Adhere a star at each end for the hands. Attach the arms on either side of the body.

I free-hand cut the tail and added a yellow star at the end. Adhere to the back of the box.


Fill your Dragon with treats!

Thanks for stopping by today and I hope you enjoy the rest of the week! And have a Happy Chinese New Year!


Sunday, January 15, 2012

Joy of Crafting's 200th show!

This second Joy of Crafting show for January is also our 200th show! So to celebrate, we have some of our favorite crafters sharing their great projects with you.

Our first guest is one of our favorite paper crafters, Cheryl Miyashiro. Cheryl shares with us a cute project using the Sizzix e-clips machine.

A sweet favor box embellished with a butterfly is made using the Bag, Boxes and Albums #2 cartridge.

Next, we have out favorite One Stroke Certified Instructor, Frank Dumlao. This time Frank shows us his painting techniques to make a beautiful waterfall painting.

Look at all of the details!

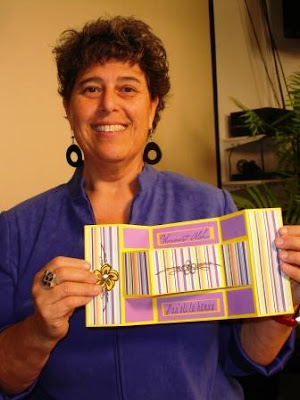
Lastly, Deb Zeleznik from Rubber Stamp Plantation shows us how to create a wonderful multi-panel flip card. She takes us through the basic card steps and then embellishes it with some of her cute local themed stamps.

This is how the card looks when it is closed.

And when the card is opened.

We're really happy that we were able to hit this milestone of 200 shows and it's all ben possible only because of the support that you have given us over the years. Mahalo Nui Loa!

We'll keep trying our best to bring you Fun and Exciting Craft projects and techniques so that you can explore your own creativity and share what you make with your family and friends.

Thanks for taking time out to visit today and I hope you get a chance to watch the show. Happy Crafting!

Friday, January 13, 2012

It Really is Clearly Better!

I love stamping, always have, always will. Bought my first stamps with my own money when I was about 8 years old and haven't stopped since. Before, all the stamps were rubber but now there are so many cute designs in the clear cling type.

Now, I love my Memento black ink pad but sometimes it just doesn't do the clear stamps justice. So, I decide to do a test and see if the "Clearly Better" ink pads did indeed work better.

And, it did! The images on the right were inked up with the Clearly Better ink and the left side was the Memento.Not sure if you can see but for the bird on the right, the details show up better and the left looks a little smugde-ier. The Heart of Hearts really show the difference.

Memento ink

Clearly Better ink
 I'm sold! The good news is that the Clearly Better ink pads also come in colors! Guess it goes back to using the right tools makes it come out better and easier.


By the way, that Heart of Hearts stamps are the part of the new collection that came in from G Studio, what a bargain!

Thanks for stopping by again today, and I hope you all have a really Great Weekend!

Fifty is Nifty!


Wanted to Congratulate the Crankin' Out Crafts crew from Enchanted Lake BFC for posting their 50th youtube video! Great Job everyone!
If you haven't checked them out yet, just go to the blog and click on the links. You'll learn a lot of crafts and there's a new theme every week.

Thanks for stopping by today and hope you all have a great weekend!

Wednesday, January 11, 2012

Para..Para..Paracord!

Sorry, got that Coldplay song in my head as I was making these cool paracord bracelets. They are so easy to make and I was thinking I could add stuff to them for different occasions.


First, let me tell you a little about paracord bracelets. The strong and useful parachute cord is made into a bracelet so that you can have this useful cord with you in case of an emergency. The history of its uses comes from the military and everyday civilians have adopted this smart idea. Generally, each inch of the bracelet equals to about a foot of cord. There are many uses for this cord like making a tourniquet, docking a boat and of course, tying things together for a makeshift shelter. In other words, you might be able to use it in an emergency. All a person has to do is unravel their bracelet and they have this useful cord.

Here's how to make one. You'll need  about 8-10 feet of cord and the little buckle. I suggest taping the ends of the cord to keep it from unraveling and also it makes it easier to go through openings.Ben Franklin Crafts carries these supplies. First, measure your wrist and add an inch. That will be your bracelet length.

 Fold the length of cord in half to find the center, then attach by looping it around one side of the buckle.

 Undo the buckle and turn them around with the wrong side facing up.Slip the ends of the cord onto the other side of the buckle. Have the cords coming out from the right side to the back side.

Leave the bracelet length you determined earlier in between the ends of the buckles.

 Now, you will begin the knotting process. First, take the left cord and place it under the two middle cords and on top of the right end cord.

 Bring the right cord around and through to knot.


 Tighten the knot.


 Now, take the right cord and place it under the two middle cords and on top of the left end cord.


 Bring the left cord around and through to knot.


Tighten the knot.


 Repeat these steps until you reach the end of the bracelet. To finish off the bracelet, trim the ends.

Then, you can either burn the ends of the cord and as it melts, attach it to the braided cord. Or you can slip the ends under and weave it through to hide. I prefer slipping the cords under, to secure. Besides, then you'll be able to undo the knotting when you need the cord!


 What I'm thinking is that you can use these bracelets for graduation by tying on two accordion folded $10 dollar bills.  Slipped on a graduate's wrist, it will stand out and not get lost in the pile of lei! Later, if they use the money, they can still have a bracelet to wear.

 Or you can add on beads as you tie the knots. If you use sport design beads, you can use this for the end-of the-season gifts for the team!You may need to string the beads on with a thinner cording to attach.

It's always fun to make something and then turn it into your own project by adding stuff on!
Thanks for stopping by today and hope you're having a great week!

Friday, January 6, 2012

Here's one to carry

It must have something to do with my resolution to stay organized, but here's another calendar project that's even faster to make!

Take some envelopes. I used the ones for the 4.25" x 5.5" cards in my favorite Brown Bag color.You'll need 12 -13.

I used some scraps and cut cardstock pieces 3.5" x 5". Rounded the corners, just because. Used the monthly calendar stickers to make it faster but you can always print some up on your computer.

Cut a printed design paper  for the top about 2.25" x 3", rounded those corners, too. I haven't done all the months in order and I am adding little stamped images or cut-outs as I go.

Decorated some small binder clips to hold the envelopes together.

This is how it came out. I'm going to use this calendar to carry with me. I can store receipts or other memorabilia inside of the envelopes. I can also write notes on the backside.I can also just carry the current month with me or as many months as I like. At the end of the year. I will bind it into a mini album, that's why I left space along the left edge.

I mention using 13 envelopes in case you want to make a "cover" page.

Working on two resolutions here, getting organized and using up my scraps! do you have any craft related resolutions?

Thanks for stopping by today and hope you enjoy the first weekend of the New Year!

Thursday, January 5, 2012

Day after Day, Year after Year

I decided to make a calendar for one of my first projects of the New Year. By using the wood block R-T-D calendar, I can use this year after year.

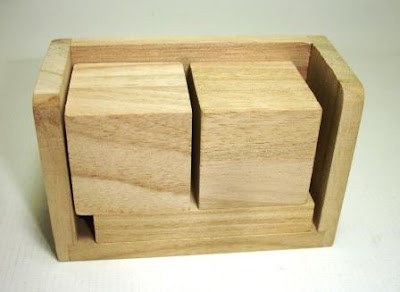
The calendar set comes like this.

These are the separate pieces.

The hardest thing was deciding on a color, so I just went and painted it black.

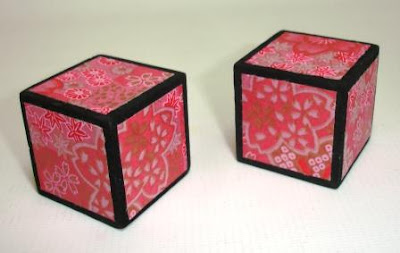
Next, I covered the pieces with washi paper using Meriken double stick tape. I left a tiny border around the all of edges.

For the months, I decide to use theses stickers which made it really fast and easy. I just trimmed them down a bit to fit the pieces. A month sticker goes on all four sides of the three pieces.

For the days of the month, I used these foam Thickers. I thought they matched the font on the month stickers.On one cube , I have 1 - 6. On the other cube it's 7 - 9, 0, 1 and 2. That covers all of the days of any month.

It was a really fast project! The cool thing is the Meriken double stick tape and the wood calendar set (along with other wood) are on sale for the whole month of January at the Ben Franklin Crafts stores. I know I need to go back and get some more calendars so I can give them away,plus I need to stock up on tape!

Thanks for stopping by today and I hope you're enjoying the New Year! Happy Crafting!