http://www.blogger.com/
Showing posts with label make it Monday. Show all posts

Monday, April 4, 2016

Make It Monday - Twinkie Hula Girl!

Today's Make It Monday project is really sweet!  Wednesday, April 6 is National Twinkie Day! While I'm not a super Twinkie fan (I prefer Hostess Cupcakes) I do love them as a cake decorating surface! Back in the day when I was teaching Wilton Cake Decorating, Twinkies were a fun way to practice our skills without having to bake a cake. Being from Hawaii, one of my favorite designs was the Hula Girl made with the banana Twinkies they used to make, those had a nice warm brown color.


Here's our 2016 Hula Girl Twinkie! We also have a project sheet on our website.


Make some icing or use the Readymade Wilton Decorator Icing in white.


Use the Wilton Icing colors to make the different colors you need. Don't use food coloring, it has too much liquid and can alter the icing consistency.The best way to add color is with toothpicks. Poke a toothpick through the foil wrapper and get some color on it.


Stick the toothpick into the white icing and stir. Always use a clean toothpick to add more color.


I like to start with the hair first. For the hair, I mixed up a little brown icing and I used the  #47 Basketweave  tip to make some beautiful wavy hair. Use with the serrated edge facing up to get the line texture. TIP: For better coverage, you can spread a little icing on before piping the hair on.

Make the hair as long as you like, styled as you want, have fun!


For the body, I used the #47 Basketeweave with green icing to make the grass skirt. You can use other tips like rounds or even #233 Grass, test to see how you want the skirt to look.Starting from the midpoint of the Twinkie, I make rows of the green strips around the Twinkie.


Next, I used the #5 Round tip to make two white dots for the eyes. A little later, I will add a dot of black gel to the center for the eyes.


I also use the #5 tip and white icing to make two patches above the skirt for the coconut bra.


You can make large icing circles in brown but I like to use Whoppers for the coconut bra top.
The icing helps to hold them in place.
.

The finishing touch is make a lei around the neck. Use a Star tip to make a ruffle around the neck for a lei. You can also put a flower in her hair. I used #18 Star tip.


I added a finishing touch to her skirt with a ruffle of green at the top using the #18 Star tip, like the lei. Now, your Hula Girl is ready to celebrate! Hau'oli la Hanau, Twinkies!

Thanks for stopping by for this week's Make It Monday! Happy Crafting!

Monday, March 7, 2016

Make It Monday!

We have something new happening on Mondays starting today, the first Monday of National Craft Month! How appropriate, right?! Each Monday, I'll have a new project for you, totally random, sometimes super simple, sometimes more intense. You'll just have to check it out and see!

I decided we needed something magical to start it off, so why not a Spring Flower Fairy? So, here we go!

Start by matching up the size of your flower with a plain wood bead or ball. For my fairy, I'm using those beautiful but inexpensive rose bushes in the stores and I found the 1" wood ball with the hole on the bottom would work.

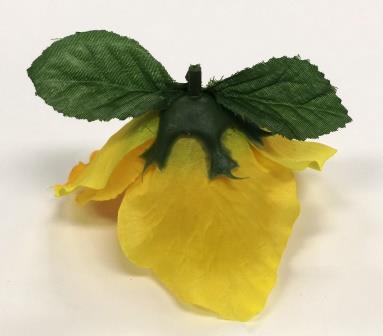
Pull off a flower head and the leaves from the stem.
 
Pull off the stem and small calyx from the leaves.
 

Cut apart the leaves so that you have just two separate leaves. Place the rose head so that the calyx is at the top.Glue the two leaves onto the calyx for the fairy's wings.

 
Next, you will add the wood ball to the top of the calyx for the head. TIP: When looking at the wood ball, do not use the side of the ball with the circular wood grain for the face. If you do, when you add the eyes, it could end up looking like a little "piggy" face, the circles creating a snout.
 
Instead, use the side of the ball that has the wood grain lines going vertically up and down. It makes for a more pleasant face.
 
 
Glue the wood ball on top of the rose. If you are using a wood ball that doesn't have a hole at the bottom, trim the stem of the rose as close as possible and glue the ball right on top of the calyx.
 
For the hair, wrap jute twine around a 3" wide scrap of paper about sixteen times. Bundle and tie together in the middle with another short piece of twine.
 
 
 Cut the loops apart. Make a shorter bundle of about 8 loops for the bangs, cut the loops apart, too.

 Glue the longer hair bundle at the top of the head. Glue the bangs bundle right next to it, in front above the face. Trim the twine to make the hair neater and glue down to the head as needed to keep the hair in place. NOTE: You can also use yarn or even Spanish Moss for the hair.
 
Use the end of a thin paintbrush to make dip dot eyes on the face. First, make black dots and let dry. Then, make smaller white dots on top for highlights and let dry. Use a red/pink colored pencil to lightly draw in cheeks or you can use real makeup blush. Tie a small bow with sheer ribbon and glue to the neck.

Add a pin back to wear your Flower Fairy or glue on a magnet. Place her in a fairy garden setting or a terrarium. You can also use her as a topper for a party favor. There's many ways you can use your Flower fairy to brighten someone's day!

Hope you have fun making your own Flower Fairies and if you need, we have a project sheet available, too, right here.

Thanks for joining us today and stop by next week for another Make It Monday!