It's Day 12 of the 13 Days of Halloween, is your costume ready? Today's project is for those who don't want to dress up, but still want to show some spirit...
So, what better way to get into the Spirit of Halloween than to wear a tiny ghost pin!
This is a super quick project so that tomorrow you'll have something to wear! Here's the project sheet.
Thanks for stopping by today and I hope you have a spooktacular day!
Showing posts with label Halloween Crafts. Show all posts
Tuesday, October 30, 2012
Monday, October 29, 2012
13 Days of Halloween - Day 11
We're getting closer to Halloween! It's Day 11 of the 13 Days of Halloween! Today's project is a
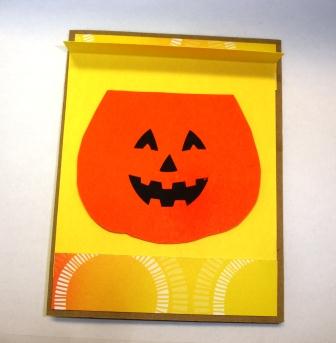
This is the make 'n take project I did earlier this month at Mapunapuna Ben Franklin's World Card Day event.Here's how to put it together: (Note, you can choose your own colors, I'm referring to the sample)
Draw a pumpkin shape that is no wider than than 3 1/2" and 2 7/8" tall so it will fit on the 4" cardstock piece. Trace and cut out of orange cardstock. Make the top of the pumpkin a straight edge. If you want to use my pattern, e-mail me at joyofcrafting@gmail.com.
Use the Martha Stewart Pumpkin Face punch to create the jack 'o lantern face. Or you can draw a face in with markers.
Keep the folded edge of the yellow cardstock down. Line up the top of the pumpkin right under the folded edge.
Use a craft knife to make a slit along the line. This is where the gift card will slide in.
Place a piece of black cardstock behingd the pumpkin cut-out face, tape in place.Use foam dots to glue the pumpkin in place.
Cut two 1"x 4" strips of printed cardstock. Place one strip at the top on the front of a 4 1/4" x 5 1/2" kraft colored blank card base, leave a 1/8" border.
Place double stick tape on the back of the yellow cardstock, placing the tape only on the sides and bottom. Attach the yellow cardstock to the front of the card, about 1/2" down from the top of the printed strip.
Take the second 1" x 4" printed strip and tape to the bottom of the card leaving a 1/8" border on the sides and bottom.
Punch out some leaves from green cardstock using the McGill Lily punch.
With the flap down, place the leaves along the flap for the top of the pumpkin. Tie a small ribbon bow and glue to the top of the leaves.
Place your gift card in the pumpkin pocket. You can write a message inside of the card, too.
Thanks for stopping by today and hope your week is off to a great start!
Pumpkin Gift Card Holder!
This is the make 'n take project I did earlier this month at Mapunapuna Ben Franklin's World Card Day event.Here's how to put it together: (Note, you can choose your own colors, I'm referring to the sample)
Cut a 4" x 5" yellow cardstock. Score 3/4" along the 4" edge. Fold down.
Draw a pumpkin shape that is no wider than than 3 1/2" and 2 7/8" tall so it will fit on the 4" cardstock piece. Trace and cut out of orange cardstock. Make the top of the pumpkin a straight edge. If you want to use my pattern, e-mail me at joyofcrafting@gmail.com.
Use the Martha Stewart Pumpkin Face punch to create the jack 'o lantern face. Or you can draw a face in with markers.
Keep the folded edge of the yellow cardstock down. Line up the top of the pumpkin right under the folded edge.

Lift the flap and use a pencil to draw a line along the top of the pumpkin.
Use a craft knife to make a slit along the line. This is where the gift card will slide in.
Place a piece of black cardstock behingd the pumpkin cut-out face, tape in place.Use foam dots to glue the pumpkin in place.

Place double stick tape on the back of the yellow cardstock, placing the tape only on the sides and bottom. Attach the yellow cardstock to the front of the card, about 1/2" down from the top of the printed strip.
Take the second 1" x 4" printed strip and tape to the bottom of the card leaving a 1/8" border on the sides and bottom.
Punch out some leaves from green cardstock using the McGill Lily punch.
With the flap down, place the leaves along the flap for the top of the pumpkin. Tie a small ribbon bow and glue to the top of the leaves.
Place your gift card in the pumpkin pocket. You can write a message inside of the card, too.
Thanks for stopping by today and hope your week is off to a great start!
Saturday, October 27, 2012
13 Days of Halloween - Day 9
On Day 9, I ask myself, so which should we do next? And I answer, not which project, but
This one is super simple. Just buy some black cardstock at the Ben Franklin Craft store and you can use the Accu Cut die cutting machine for FREE to make this Witch's Hat Favor. Here's a project sheet , too!
Thanks for stopping by today and I hope you're enjoying your weekend!
Witch project!
This one is super simple. Just buy some black cardstock at the Ben Franklin Craft store and you can use the Accu Cut die cutting machine for FREE to make this Witch's Hat Favor. Here's a project sheet , too!
Thanks for stopping by today and I hope you're enjoying your weekend!
Friday, October 26, 2012
13 Days of Halloween - Day 8
It's Day 8 of the 13 Days of Halloween and I want to...
I got this project idea from my Seattle friends and decided that I needed to make one for myself. First, take two candy stick bags and fill them with colorful Sixlets candy. I alternated purple and bright green colors to make it look like striped socks.
Cut out two witch's shoes with your own pattern or you can e-mail me at joyofcrafting@gmail.com, if you want my pattern. Fold the black cardstock in half and place the pattern with the bottom of the shoe on the fold line, trace and cut out.
Place tape around the edges of the shoe to hold in place. Add a little ribbon bow on top.
Take the Clever Lever 3 1/2" Scallop Circle Punch (Lt. Green) and punch out one circle in a coordinating print.
Find the center point of the circle (1 3/4") and score it 1/8" to the left ( 1 5/8") and to the right
(1 7/8") to form a "spine". You need to have a spine to compenstae for the thickness of the skirt.
Carefully gather up the scored 2" strip into a half rosette. Place onto half of the circle, right side down and press into the glue dot.
Fold the other side of the circle over and adhere to the other side of the half rosette. Turn over, your witch is done.
I wanted to hang my witch up so I made a broom for her to ride on. I took a 12" wooden dowel. Bundled a bunch of raffia at one end of the dowel and wrapped a strip of raffia around it and tied it onto the dowel.
I attached the witch to the broom by making a cardstock sleeve that was slipped over the dowel and taped to the back of the witch's skirt. Tied on some ribbon for the hanger.
Witch You All a Wicked Weekend!
Cut out two witch's shoes with your own pattern or you can e-mail me at joyofcrafting@gmail.com, if you want my pattern. Fold the black cardstock in half and place the pattern with the bottom of the shoe on the fold line, trace and cut out.
Open up the folded shoe, place the end of the filled candy stick bag inside, tape in place and fold up the shoe.
Place tape around the edges of the shoe to hold in place. Add a little ribbon bow on top.
To make the skirt, take a 2" x 12" strip of "Halloweeny" paper and score it every 1/4".
Accordion fold the strip.
Take the Clever Lever 3 1/2" Scallop Circle Punch (Lt. Green) and punch out one circle in a coordinating print.
Find the center point of the circle (1 3/4") and score it 1/8" to the left ( 1 5/8") and to the right
(1 7/8") to form a "spine". You need to have a spine to compenstae for the thickness of the skirt.
Fold and crease the circle at the scored lines. Unfold the circle.
Place a XXL 2" Glue Dot on the inside of the circle.
Carefully gather up the scored 2" strip into a half rosette. Place onto half of the circle, right side down and press into the glue dot.
Place the two witch's legs onto the skirt.
Fold the other side of the circle over and adhere to the other side of the half rosette. Turn over, your witch is done.
I wanted to hang my witch up so I made a broom for her to ride on. I took a 12" wooden dowel. Bundled a bunch of raffia at one end of the dowel and wrapped a strip of raffia around it and tied it onto the dowel.
I attached the witch to the broom by making a cardstock sleeve that was slipped over the dowel and taped to the back of the witch's skirt. Tied on some ribbon for the hanger.
Thanks for stopping by today and I Witch you an very Wicked Weekend!
Wednesday, October 24, 2012
13 Days of Halloween - Day 6
On Day 6 of the 13 Days of Halloween, we're doing a flashback from the very first post of this blog!
Our favorite French Fry Box Owl!Here's a link to the original post explaining how to make this simple treat box. Make your french fry box using your Sizzix die or cut it out with your eclips machine.
Thanks for stopping by today and I hope you're getting ready for a crafty weekend!
Tuesday, October 23, 2012
13 Days of Halloween - Day Five
Today, we have a Two for Tuesday for Day Five of the 13 Days of Halloween!
Go to our Ben Franklin Crafts stores, buy a piece of orange cardstock and you can use their AccuCut die cutting machine for FREE to cut out the Small Take-out Box. Assemble the box and turn it upside down so that the opening is at the bottom.
Take a 1 1/2" x 2" piece of brown cardstock and roll it up for the stem.You can use a long reach circle punch to make a hole in the bottom of the box (before assembling) for the stem, but I just made a small hole with my scissors. That way, I had a nice fit when I pushed the stem in. Use a little glue on the inside of the box to hold it in place if it is too loose.
Cut out some leaves from green cardstock. I used the McGill Lily punch to make some leaves. I shaped the leaves by just pinching in the sides a little.
Your pumpkin is done. Just open the box and fill with treats. You can add a jack 'o lantern style face if you like, I just kept it simple.
The second project uses a white take-out box to make a ghost. Assemble the box and turn it upside down.
Added an orange bow for some color. Fill with treats and your ghost is good to ghoul!
Thanks for stopping by today and hope you're having a great week!
First, we have a Take-out Pumpkin!
Go to our Ben Franklin Crafts stores, buy a piece of orange cardstock and you can use their AccuCut die cutting machine for FREE to cut out the Small Take-out Box. Assemble the box and turn it upside down so that the opening is at the bottom.
Take a 1 1/2" x 2" piece of brown cardstock and roll it up for the stem.You can use a long reach circle punch to make a hole in the bottom of the box (before assembling) for the stem, but I just made a small hole with my scissors. That way, I had a nice fit when I pushed the stem in. Use a little glue on the inside of the box to hold it in place if it is too loose.
Cut out some leaves from green cardstock. I used the McGill Lily punch to make some leaves. I shaped the leaves by just pinching in the sides a little.
I used some mini glue dots to attach the leaves around the stem.
I cut some thin strips of green cardstock and wrapped it around a pencil to help curl them.
Attached these curls to the top for the vines.
Your pumpkin is done. Just open the box and fill with treats. You can add a jack 'o lantern style face if you like, I just kept it simple.
The second project uses a white take-out box to make a ghost. Assemble the box and turn it upside down.
For the eyes, I made them the same way as for the Lollipop Bat. Standard Oval punch(orange) in green and EK Success 5/16" punch in black. Highlights done using the white Galaxy Marker.
Used a black Sharpie to draw in a smile.
Added an orange bow for some color. Fill with treats and your ghost is good to ghoul!
Thanks for stopping by today and hope you're having a great week!
Monday, October 22, 2012
13 Days of Halloween - Day Four
Coming up with 13 Halloween projects wasn't super easy for me, in fact it, made me a little Batty!
Use the Clever Lever Standard Oval (Orange) and punch out two ovals from green cardstock for the eyes. Use EK Success 5/16" circle punch and punch out two circles from black cardstock for the eyes.
Place the eyes onto the upper half of the oval and glue in place. Use a white marker (American Crafts Galaxy Marker) and draw a squiggly mouth. Use the marker to draw in fangs, let dry. Use a red marker or pen to add red to the tips of the fangs.
Use the Clever Lever Shipping Tag (purple) and punch a tag from cardstock. Take the 1/4" hole punch and punch a hole on the pointed end.
Place a wing on either side of the body and glue to the back. Place the bat onto the tag and tape in place.
So here's Day Four's project - a Batty Lollipop cover!
Use the Clever Lever 2 1/2" Oval (Pink) and punch out one oval from black cardstock for the bat body.
Cut out two bat wings from the black cardstock. I free-hand drew a pattern. If you want to use mine,
e-mail me joyofcrafting@gmail.com and I'll send it over to you.
Use the Clever Lever Standard Oval (Orange) and punch out two ovals from green cardstock for the eyes. Use EK Success 5/16" circle punch and punch out two circles from black cardstock for the eyes.
Layer the black circle onto the green eyes and glue in place. Use the white Galaxy Marker for accents.
Place the eyes onto the upper half of the oval and glue in place. Use a white marker (American Crafts Galaxy Marker) and draw a squiggly mouth. Use the marker to draw in fangs, let dry. Use a red marker or pen to add red to the tips of the fangs.
Slip the tag onto the lollipop, tape in place.
Place a wing on either side of the body and glue to the back. Place the bat onto the tag and tape in place.
Tie a bow to the lollipop stick.
Thanks for stopping by today and hope you have a FANG-tastic week!
Subscribe to:
Posts (Atom)