http://www.blogger.com/

Monday, December 12, 2011

Up on the house top reindeer paws..

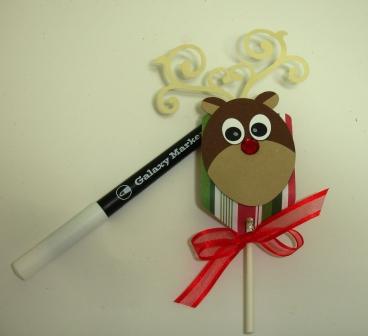
Actually, these reindeer don't have paws which makes them even quicker to make! Just wanted to share a fast lollipop cover project. It's not too late to make something small to tuck into a stocking or give out to co-workers!
Like the penguin, we're using oval punches (all Marvy Uchida unless otherwise notated).

First, take some brown cardstock and punch out one oval with the pink oval. Next, take a lighter brown cardstock and punch out an oval with the blue oval punch.

Place the light brown oval along the bottom horizontally across the larger oval and tape in place. From the other side, trim off the excess to form the muzzle.

For the ears, use the peach oval punch and punch out two ovals from the brown cardstock and

one from the light brown cardstock.(sorry photo angle makes them look like circles, but they are ovals.)

Cut the light brown one in half and glue one half to each of the brown ovals to form the inner ears.

For the eyes, I used the EK Success 5/16" circle punch and punched two circles on a scrap of white cardstock. If you want smaller eyes, you can use a 1/4" circle punch. Then you take the peach oval punch and center over the openings and punch out the eyes.

Place some scraps of black behind and glue in place.

Place the eyes above the muzzle and glue in place. Place the ears behind the top of the head and glue in place as shown.


I used a red flat back crystal for the nose, you can use a pom pom or punch out a heart or circle, whatever you prefer.

For the antlers, I used beige cardstock and cut out a pair of flourishes from this Sizzix die.

Taped the flourishes behind the top of the head. Look! The antlers form a heart!


Punched a tag from the purple shipping tag punch and then made a 1/4" hole near the pointed end.

Tape the reindeer to the tag. Put a strip of double stick tape on the wrapped lollipop.


Slip the lollipop stick through the hole.and tie a bow on the stick below. Use the white Galaxy marker to dot the eyes for highlights.

Here's the finished reindeer lollipop cover. Originally made these as a make and take at Hilo Ace Hardware's 60th celebration in November. You could make a whole herd and place them on a lollipop stand for a centerpiece or give them out to your "deer" family and friends.

Thanks for stopping by today and hope you have an awesome week!


Friday, December 9, 2011

Gingerbread Girl

Tonight, I am going to an employee Christmas Party for a Waikiki hotel which happens to be one of my sweeties's accounts ( that's why we get to go) Everyone was given a gingerbread person shape to decorate for a contest. So, here's my entry, #53.
Ginger Girl has a beautiful tan thanks to some Bazzill cardstock. She was sweetened up with some White Scribbles paint icing all around her outline. Her cute dress has a bodice of Bazzill cardstock and a coordinating printed skirt courtesy of Doodlebug Designs. It is cinched at the waist with a sassy velvet bow made from American Crafts ribbons. Her Santa hat was found in the Christmas ornament aisles of Ben Franklin Crafts.

Her icing got a little messy and she got some under her chin. So, just like in the old T-shirt painting days, I needed something to cover it up. I thought, since it's a Christmas Party, why not hold a wreath? Her wreath was made by cutting off the branches from a tinsel pick spray. Twisted them together into the circle shape. Cut some berries off another pick and glued them on. Wrapped a flashing bulb necklace around for added bling!

I know you can't tell but she's actually quite large. The cut-outs they gave us  were over 12" tall. I don't care if I will win, I really just want to see what creative ideas other people do, that's the fun part!

Thanks for stopping by today and have a great weekend everybody!

Wednesday, December 7, 2011

A Slice of Cake for Santa

Instead of cookies, let's make Santa some cake! On second thought, let's make a cake slice into Santa!

I needed to make some favors for a business luncheon so I started with my favorite Accu Cut Small Cake Slice box.


Cut the boxes out of red cardstock, easy enough. Cut some strips of white cardstock (about 1/2" wide) for the "fur trim" I cut my curvy edges free hand, you may want to use a decorative border punch. Taped the strip down the middle. Or, you can leave off the fur trim. Next, cut a 1/2" x 8 1/2" strip of black cardstock for Santa's belt. I placed double stick tape onto the strip, then centered the box onto the strip. I carefully wrapped the ends of the strip to the front and cut off the excess. Because of the shape of the box, the strip will not go around completely straight, but as my co-worker Kami said, it looks like how Santa's belt wraps around his big belly!

I used American Crafts glitter cardstock for the buckle. First, cut a thin strip 1" long and taped that to the center of the belt.


Next, cut a piece 1" x 1 1/2", folded it in half and cut the center out. (The cardstock is forgiving so you won't see a fold line.) Centered this over the middle strip and taped it on to finish the belt buckle.

This really was easy, made 20 of them in about an hour!If you missed it, I showed you how to make a more formal cake slice favor in yesterday's post.

Thanks for stopping by today and I hope you're having a Great Week!

Tuesday, December 6, 2011

Tuxedo Cake?

The other night, we had our annual Oahu company holiday party. We sorta had an awards show theme so I came up with a simple favor to match.

I took my favorite Accu Cut die - small cake slice box and cut them out in black cardstock. We took the boxes and turned them on their sides so that the opening is on the bottom.

Then,  I cut out white triangles with my e-clips machine. I used the Basic Shapes cartridge and chose a miscellaneous shape-pennant. I made them 1 1/2" wide and about 3" long.These were for the "shirts".

I took the white triangles and punched three 1/8" holes down the center. Next,we taped the triangles onto the box, the black shows through the holes and looks like buttons.

Tied bows with some red grosgrain ribbon and glue-dotted them on for the finishing "bow tie" touch. Note: When I made the bows, I trimmed the tails and taped them to the back so they wouldn't show.

I wanted to share this idea because it was very easy and you may want to use it for New Year's or a similar themed event.

Thank you to my co-workers in accounting for helping to tape the boxes together, fill 'em with candy and then tape on the triangle"shirts" And thank you to my boss for trusting us...he kept questioning "Black? for Christmas favors?" then go into his office and come back out "Black? Are you sure? Not very Christmasy?" LOL! He understood later!

Thanks for stopping by today and have a great week!

Monday, December 5, 2011

December's First Joy of Crafting Show

The first Joy of Crafting show for December starts with a great craft project for a gift!


Gloria Arias from our Pearl City Ben Franklin Craft store shares with us a new Kumihimo braid. It is absolutely beautiful!

Next, we have a very special guest...Kim Gennaula, Aloha United Way's new President, who helps us make one of the recipes from our new fundraising cookbook, "Mixing Things Up - Recipes from the Past, Ingredients for our Future."

Kim, along with Noelle Maeda from our HR dept. (they were in charge of the cookbook) show you how to make a "Whatever I Like" cake submitted by Christine Beck from our Naalehu Ace Hardware. It's a fun and easy recipe and it tastes so onolicious!

You can get your own copy of our cookbook at any of our Hawaii Ben Franklin Crafts stores and Ace Hardwares stores on the neighbor islands as well as our Las Vegas and Seattle area stores. In the cookbook, there are lots of interesting stories that go along with the recipes, that's my favorite part!But Best of all, the whole $10 goes to the local United Way of the store you purchase it from.

Our last guest of the show, Shari Hanai from our Mapunapuna Ben Franklin Craft store helps us get ready for the Holidays with a quick and easy charm bracelet.

Make one now for Christmas and use the same techniques for other occasions, too. It's also a great gift idea!

Thanks for stopping by today. I know you're all very busy so I really appreciate it! Have fun with your Holiday Crafting!

Friday, December 2, 2011

Don't Feed the Bear, Feed the People!

Happy Holidays, everybody! Here at Ben Franklin Crafts, we want everyone to have a Happy Holiday so we are collecting food for the Hawaii Food Banks.

From today until Sat., Dec. 17th, everytime you  bring in a canned good or bag of rice, we'll give you an extra entry blank to win a cuddly Teddy Bear!That's right, don't need to feed the bear, he's already really stuffed! Let's help feed the people who are truly in need.

Not sure what kind of food? Well, the top 5 items needed are:
1) Canned Meats and Tuna
2) Canned Meals (like Spaghetti, Chili, Corned Beef Hash)
3) Canned Soup
4) Canned Vegetables
5) Canned Fruit

As you can see, our Teddy Bear is really cute and he's huge! He'll make the perfect gift for someone or a really FUN crafting companion for you. No, he can't count for the carpool lane, sorry!You can enter at any of our 6 Craft stores, there's a bear looking for a home at each store.

Thanks for stopping by today, I know you're all really busy! Stay safe and have a Great weekend!

Tuesday, November 29, 2011

Treat Tube Holder - got how-tos!

Hi All! The project sheet is now on the website. Here's a link.
Thanks for stopping by today and hope you're having a wonderful Holiday Season!

Monday, November 21, 2011

November's Second Joy of Crafting Show

For this second show of November, we have three fun craft projects. We start off the show with Yu Ming Zhu, the Sumi Watercolor Artist from Seattle.

In this show, Yu Ming shows us how to do watercolor painting using the sumi techniques, this time in color.

Again, he explains a lot about how to compose the design of the painting and how to achieve different looks with different brush strokes.

Our next guest was Cheryl Miyashiro with another great project for the season!

Cheryl shows us how to make a Double Slider Gift Card Holder. (We'll be posting up a project sheet soon!)

Lastly, I show you how to make a simple holder for our new treat tubes.

You can just make one or put two together! (I'll let you know when the project sheet is posted!)

Thank You for stopping by today and I hope you're having a lot of FUN with  your Holiday projects!

Wednesday, November 2, 2011

More from the He-art

If you've been following along, you know that I have been part of a 23 week He-art Journaling challenge. Each week we get a new theme that we need to use to create our pages with .Well, we're up to week 15! And this time it was about Sticking it to ya!

So, I created a TAPE-stry using my favorite Packing Tape transfer method. I showed you how to do this back in June. After I made my own "stickers",  I used washi tape and smash tape to stick it on the pages. This week's assignment was super fun to do!

I transferred images from magazines and catalogs. That full moon on the top is from the HMSA magazine that gets mailed to me.I love the T-shirt saying about being Fun Size! I know a lot of you can relate, LOL!

Love including the Pooh-isms from a catalog, so sweet!It's my TAPE-stry, like Carole King wrote in her famous album title song Tapestry," My life has been a tapestry of rich and royal hue, An everlasting vision of the ever changing view..."

In week 14, we could only use up to 2 colors, two-tone. So, I went for high contrast in black and red. Yes, I believe it...all you need is love!

In week 13, we had to choose our Lucky Number. I had already wrote about my favorite number on a prior week, so this time I wrote it up BIG. Sweet 16!

Week 12, we had to use watercolors or create a similar effect. I have been using watercolors for a lot of my pages because it's so fun to use. So, I created these pages, with two different looks.

One more photo to share. A couple of Saturdays ago, I went to the Nonstop Kakaako event to check out the grindz from all of the food trucks. Besides the food,  there was an empty store that they transferred into a huge piece of art for the people. Three walls had these sketches and there was a table of crayons. You grabbed your crayons and colored. It was fun, here's our alien that me and G colored (he had to to do the top, I could barely reach!) But remember, I'm not short, I'm  Fun Size!

Thanks for stopping by today and I hope you get to create some He-art this week, too! Happy Crafting!

Monday, October 31, 2011

Facebook Friday Winner!

Happy Halloween! Thank you to everyone who played Facebook Friday all Craftober long. Here's the moment you've all been waiting for...and the random winner is...

Congratulations, Linda Kuniyoshi! I'll be sending you your $25 Ben Franklin Crafts gift card and some extra goodies like a clear stamp set from 7 Gypsies, embossing folders and some other crafty stuff.

Hope you are all having a great Halloween! Scroll down to my earlier post if you want to see my costume and some of my ghoul friends!

Happy Halloween!

Happy Halloween, Everyone! I actually celebrated Halloween a little earlier in September when I visited one of our sister craft stores in Nebraska. They are REALLY into Halloween in Nebraska, they say that's where it all began...

They build a huge Haunted House in their parking lot every year and it's always different. I swear it took us a good 20 minutes to go through the whole thing. It was So Cool and I made a lot of new friends!See...


And here in Hawaii, our Honolulu office got into the Spirit of the day!

Do you recognize any of these characters?

Yes, Charlie Sheen, still trying to pick up flight attendants!

Thanks for stopping by today and I hope you all get a lot of Treats today! I'll be announcing the Facebook Friday winner later this afternoon...keep you all in suspense for a little while longer!