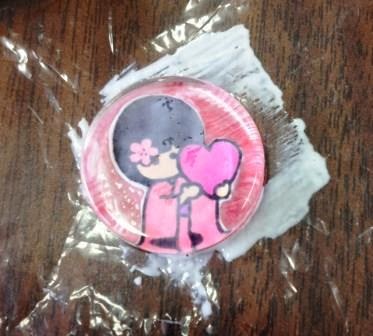
Today's project is really for tomorrow. Tomorrow is Wear Red day in support of Women's Heart Health. Show your support and wear something red!
For those of you who just want a touch of red, how about a little pin to wear? Here's Day 6's project...
Start by stamping a small image onto cardstock. I chose this cute dandelion design because the kimono girl is holding a heart..how appropriate!
Next, color your image up. I used Copic markers but a lot of times I just use colored pencils.
Cut the image out. I know that I won't be able to fit the whole image, that is why I didn't bother cutting out her feet.
I cut the image out because I am going to use a red background (wear red!). So I punch a 1' circle from red cardstock.
I cover the red circle with some Mod Podge.
Then, I added the image on top. Mod Podge acts as a glue, too.
Then, I add a coat of Mod Podge over the whole thing.
Instead of a marble, I placed a round glass tile over.
Press down to get rid of any air bubbles. Now, to let it dry.
The Mod Podge dries clear, revealing the image! Glue on a pin back to the other side. Now I'm ready for Wear Red day!
Thanks for stopping by today and I hope you're ready for another project tomorrow!
Showing posts with label Valentine's Crafts. Show all posts
Thursday, February 6, 2014
Monday, February 3, 2014
14 days of Valentines - Day 3 Funny Little Valentine!
Welcome back! Today's project, the third in the 14 Days of Valentines, is for the fun at heart!
It's time to make some Happy feet!
Grab some balloons. I chose red, white and pink to match our Valentine's theme. I separated all of the balloons into two piles and laid them out in a color repeat pattern.
Then, I started from the middle and tied a balloon onto the strap.
Then, I continued to tie all of the balloons onto the strap. One pile of balloons per slipper.
Look how fun these pair of slippers are now! You need to be careful, because someone may leave your house with them because they are so crazy fun! I once made a pair using an assorted color pack of smaller water bomb balloons. It was a fun summer wearing those slippers around. This is an easy project for kids to do, too!
Thanks for stopping by today and I hope I spock some balloon slippers around town! LOL!
It's time to make some Happy feet!
Start with an inexpensive pair of rubber slippers.
Grab some balloons. I chose red, white and pink to match our Valentine's theme. I separated all of the balloons into two piles and laid them out in a color repeat pattern.
Then, I started from the middle and tied a balloon onto the strap.
Then, I continued to tie all of the balloons onto the strap. One pile of balloons per slipper.
Look how fun these pair of slippers are now! You need to be careful, because someone may leave your house with them because they are so crazy fun! I once made a pair using an assorted color pack of smaller water bomb balloons. It was a fun summer wearing those slippers around. This is an easy project for kids to do, too!
Thanks for stopping by today and I hope I spock some balloon slippers around town! LOL!
Tuesday, February 5, 2013
14 days of Valentine's Day 4 - Wall Art
Today is Day 4 of the 14 Days of Valentine's and my projects today are from this week's Joy of Crafting Show! So simple, just take a canvas and paint it up. Decorate some paper mache letters and glue them on! These projects are keepers all year long!
First sample, I call the Summer of Love. I used yellow and orange acrylic paint and painted strokes from the middle of the canvas outward. This creates a "sunburst" effect. Then, I covered the 8" L-O-V-E with some cheerful patterend paper and painted the sides with orange paint. Glued the letters on the canvas and ta-dah! Doesn't it just radiate with Love?!
For the other LOVE sample, I painted the canvas with chalkboard paint. Then, I painted the 8" L-O-V-E with red paint. The "U" is 12" tall and I painted the sides with red and covered the top of the letter using the metallic silver poster board. I wanted to use the chalkboard paint so that we can leave messages on the sides.
I'm really loving the paper mache letters because you can do so much with them. They come in 8", 12" and 23.5" tall. And they're on sale until this week Friday!
Thanks for stopping by today and I hope you have a LOVE-ly week!
First sample, I call the Summer of Love. I used yellow and orange acrylic paint and painted strokes from the middle of the canvas outward. This creates a "sunburst" effect. Then, I covered the 8" L-O-V-E with some cheerful patterend paper and painted the sides with orange paint. Glued the letters on the canvas and ta-dah! Doesn't it just radiate with Love?!
For the other LOVE sample, I painted the canvas with chalkboard paint. Then, I painted the 8" L-O-V-E with red paint. The "U" is 12" tall and I painted the sides with red and covered the top of the letter using the metallic silver poster board. I wanted to use the chalkboard paint so that we can leave messages on the sides.
I'm really loving the paper mache letters because you can do so much with them. They come in 8", 12" and 23.5" tall. And they're on sale until this week Friday!
Thanks for stopping by today and I hope you have a LOVE-ly week!
14 Days of Valentine's - Day 3 More Treats!
Since today is Super Bowl Sunday, food is on everyone's mind, even if you don't watch the game! So, for Day 3, we have another treat holder!
This treat holder I would make for my super special people. For Valentine's Day, fill it with red, pink and white candies. For graduation, you could fill it with school colors!
Okay, enjoy the Super Bowl and Happy Crafting!
This treat holder uses the 4.5" clear tubes. You can just make half a holder for three tubes or glue two together for a six-pack!Here's a link for the project sheet.
This treat holder I would make for my super special people. For Valentine's Day, fill it with red, pink and white candies. For graduation, you could fill it with school colors!
Okay, enjoy the Super Bowl and Happy Crafting!
Monday, January 7, 2013
Joy of Crafting's first show of 2013!
Happy New Year, Crafties! It's time for a new Joy of Crafting show!
It's simple and cute, perfect for Valentine's day, birthdays, graduations and more! We even have a
project sheet for you.
Next up, we have Cheryl Miyashiro with another cute card.
It's an easy window card using Sizzix Framelits and that cute dandelion designs doggie.
Our next guest makes her debut to the show, Katie O'Shea from Market City Ben Franklin Crafts.
Katie shares a cute project from her childhood. You can make her Heart Pocket with your little ones, too!
Thanks for stopping by today and I hope you continue to enjoy our show! Have a great week and I hope to see you in person in 2013!
I start off the show with a Carnation bear!
It's simple and cute, perfect for Valentine's day, birthdays, graduations and more! We even have a
project sheet for you.
Next up, we have Cheryl Miyashiro with another cute card.
Our next guest makes her debut to the show, Katie O'Shea from Market City Ben Franklin Crafts.
Katie shares a cute project from her childhood. You can make her Heart Pocket with your little ones, too!
Thanks for stopping by today and I hope you continue to enjoy our show! Have a great week and I hope to see you in person in 2013!
Subscribe to:
Posts (Atom)