http://www.blogger.com/

Friday, April 9, 2010

Wearable Art

As I've said before, I like small things because I think they are cute. So, these Itty Bitty canvases have always been a favorite of mine. For these projects, I used the smallest size, 2" x 2".


First, I covered the canvas with a scrap of brown mulberry paper.Then, I took a scrap of DP and decoupaged it on top. Added a few crystal stickers. Then I used one of the Reflections charms "dream" and tied it on with a ribbon. I added the butterfly dangle which came from the Symbolize charms collection.


These charms collections are great and you get a lot to work with.


For this sample, I painted the canvas with bright orange acrylic paint. Carefully tore a DP scrap into a square shape and wrote "give Peace a chance" with my Pigma pen. Decoupaged it onto the painted canvas. Added some K&Co. fabric flower stickers and some colorful flower buttons.


I call these wearable art because like art, they are made on a canvas. With the added pin back, they are now wearable!

Thanks for stopping by today and I hope you all have a reallygreat weekend!

Monday, April 5, 2010

Blinkie Blinkie Tags

I'm kinda like my pets. I'm always looking around and things just catch my eye. I'm also easily amused. So, flashing PIY Tags are the perfect attention getter for people like me.


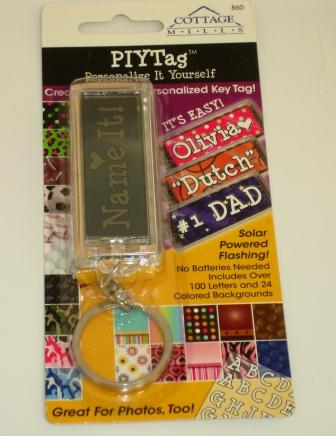
Personalize It Yourself Tags are flashing key tags that are solar powered so you don't have to worry about changing batteries.


They come with a bunch of letter and symbol stickers, so personalizing is fast and easy.


It also includes 24 different backgrounds to use. There's sports, colorful graphics and even pink camoflauge!


Just create your design, slide out the tray, slip it in and close the tray.


Here, I used a piece of scrap from my DP stash (and we all know you have a lot of that!)


As it blinks, it changes from a dark screen to your design screen. The design screen shows up really well in the light and outdoors, can't really tell from these photos.

I'm thinking I might add a photo and attach them to lei that I am giving out this graduation season. The constant flashing should catch everyone's attention! Hmmm, now I'm thinking of more ideas...

Thanks for starting your week with a visit! I really do appreciate all of your kind and sometimes funny comments! Have a great week and Happy Crafting!

Sunday, April 4, 2010

JOC First April Show

Happy Easter, Everybody! Yes, I had my fill of chocolate today and I am ready for this month's first Joy of Crafting show. We're gearing up for Graduation and our first guest makes her official JOC debut...

We welcome Lisa Loo from our Enchanted Lake BFC. She shares a clever idea that lets your graduate stand out in the crowd. She created a Sign Board with a spinning center based on those spinner cards we used to do. Just add a photo of your graduate where the yellow paper is.

Then, we aksed Daven Yokota from our Pearl City BFC to show us one of the Straw Lei creations from the new Lei book Vol.8. It's just one version of the 3 Straw Flat lei. This would be great for Mother's Day as well.

We end the show with a Hana Hou of Ruth Cancel from our Mapunapuna BFC showing us how to crochet a Twisty Lei. It's one of the easiest crochet leis to do.

Hope you get a chance to watch the show and learn something new. Thanks for stopping by today and I hope you had a really Hoppy Easter!

Wednesday, March 31, 2010

Crafting Outside of the Box...

I mean it, literally! Ben Franklin Crafts has a lot of RTD wood boxes in different styles and sizes. It's fun to see what people do with them. Take this set for example, it's simply covered with the new Bo Bunny papers from the Jazmyne line and it looks like a Designer set.


Here's some samples of the Bo Bunny Jazmyne and Sophie line. Lots of glittery effects and very rich colors. You know, I got me some!


Well, National Craft Month may be over, but don't worry, the crafting continues on! Thank You so much for visiting all month long and sharing your sweet comments! They really put a smile on my face when I read them! Until the next time, Happy Crafting!

Tuesday, March 30, 2010

Daisy Photo Holder for Max

Sometimes, something catches your eye and you like it just because it's cute and simple. Probably could make it yourself but you'd rather spend the time making something else. But, you still want one. Well, this little photo holder is just one of those things.


It's cute and simple, just perfect for displaying Max's photo. I have another one to tuck into someone's Easter basket.

Hope you all treat yourself to a little something, too! Thanks for spending time with me today and hope your week is going great! Happy Crafting!

Monday, March 29, 2010

Hippity Hoppity, Easter's on its way!

Easter is just around the corner and I still want to make bunny projects! Here's a quick and easy one made with the Sizzix Favor Box and dandelion design's bunny face.


Just add some ears and you're good to go!


Thanks for stoppping by today! Hope you all have a geat week!

Saturday, March 27, 2010

Favor Idea for Graduation

Well, today I made time to make something with the Bo Bunny Clear Party Favor in the heart shape. I used dandelion designs panda and placed the grad hat on top. Added a ribbon so that the graduate can wear it as lei lanyard. You can always tuck some paper money behind in the clamshell.


Up close, you can see I used Flower Soft to create a lei, kinda looks like a yarn lei, doesn't it?


I think I did much better at crafting this afternoon than my bowling this morning!LOL! Thanks for stopping by today and hope you're enjoying your weekend!

Friday, March 26, 2010

Fun Favors for all!

I've been wanting to make something from these cute clear party favors ever since Ben Franklin got them in. Finally, got my chance today. They come in a round shape and a heart shape in what is called clamshell packaging.


I used a bright orange print paper for the backdrop. Used some dandelion stamps (Easter's coming fast, gotta use my bunny as much as I can!) then filled it with some colorful wrapped candy. Very Fast and Easy!


The heart design is a litle smaller and I'm thinking of hanging it off a ribbon like a lanyard for a graduation lei idea. I'll share that one when I make it.

Thanks for taking time out of your busy day to stop by and visit. Hope you have a great weekend!

Tuesday, March 23, 2010

How-tos for the Mini Spring Basket

Here's the simple directions for the mini Spring basket I posted earlier today. Start with a piece of cardstock 4.5" L x 4.75" H.


If it's printed on both sides, turn over to the "wrong side". Score in 1.5" from each of the four edges. Crease well and unfold.


Snip at the four points indicated by the arrows, stopping at the horizontal crease lines.


Corner round each tab as shown.


Put a piece of double stick tape on each tab as shown.


Fold up each side, overlapping the tabs.


Fold the tabs down and adhere with double stick tape to the basket.


Cut two strips for the handles: 6" x .75" and 6" x .5". Layer the two strips. Corner round the ends and attach to the basket.


And there you have it, your mini Spring Basket! Fill with goodies and give away to your family and friends! Thanks for waiting for the measurements and directions, see how easy it was? Happy Spring!


A mini Spring Basket

I like to make small things, I think they're cute! So, I took the old Spring Basket project that uses a 8.5" x 11" cardstock and made a mini version.


If Idid the math right, I think you can make 4 of these from one sheet of 12" x 12", so that's keeping in budget. And it's quick. I had to participate in a short phone and web seminar this morning. So, I muted my phone and created this while I listened to the instructor and took notes. I did listen, I promise!(just in case my boss reads this!)

I'll share the exact how-tos later today when I get another break. Thanks for stopping by and hope you're having a Great day!

Monday, March 22, 2010

Arigato!

I love decorating these mini wooden clipboards that the Ben Franklin stores carry. They come with a little keychain so you can hang them on little gifts.


This was more of a "Just Because" type token of appreciaton for someone who does a lot of little things for me. I just cut out one of the Kokeshi dolls from dandelion's stamp. Fast & simple!


Thanks for taking time out today to visit, hope you have a great week!Happy Crafting!

Sunday, March 21, 2010

March 2010 JOC Show #2

Tonight on the JOC, March continues with another show featuring some great guests and our wonderful live studio audience! Our first guest is a familiar face from the past...Keala Magarro. Keala shares the secrets to making flowers out of Hearty Clay.


Then, we had a return visit of our favorite One Stroke Painting artist, Frank Dumlao. Frank took our wood coaster sets and painted a beautiful tropical flower collection on them. He truly makes it look so easy!


To finish off our National Craft Month celebration, Cheryl Miyashiro introduced us to the Sizzix Big Shot Pro! She used one of the new larger dies and created a very sweet gift box.


I hope you get a chance to watch this show. Did you watch the other show and see all of your friends in the audience? Did you spock yourself?! Thanks again to all who particpated and made it a truly fun day in January! I just LOVE this photo!


Thanks for stopping by and I hope you have a great week (Spring Break for some!)

Saturday, March 20, 2010

Bunny Wanna-Be

I really LOVE Jean's new designs for Spring. I think I've said that a bunch of times to people already. Anyway, wanted to play around today during my break from cleaning my office (Ugh!) So, I took my beloved Panda stamp and asked him what did he want to be. Here's his answer...


Yes, he wanted to be a Bunny so he could get lots of candy and hide Easter eggs. I'm going to see if Max wants to be a bunny, too. Maybe Elliot? Ok, 'nuf already gotta get back to the cleaning...

Thanks for stopping by and sharing my break time with me. Hope you're enjoying your Saturday!

Friday, March 19, 2010

More Flower Soft!

As promised, here's a couple of small projects I did using the Flower Soft. The first is a simple tag using the dandelion chick stamp. I made her headband into a haku lei and let her frolic in a field of flowers.


Here, I used the new dandelion bunny and created a flower pot with the wooden pot painted with terra cotta color paint. Made some flower stems to grow out of the pot and added some green FS at the bottom for moss.


I have a few more ideas that I want to play around with using the FS, I'll share them as I make them. Thanks so much for stopping today ane hope you all have a really Super Weekend!

Thursday, March 18, 2010

Flower Soft,cool stuff!

Yes, we finally have Flower Soft in our stores! I have so many projects I want to embellish with this soft, fluffy stuff. For those of you who aren't familiar with it, here's how it's packaged.


Here's a better look, there's a lot more colors than this.


And here's a small sample made by John of our Market City BFC. You just add glue to the wire, roll it in Flower Soft and soon you have a mini bouquet!


I'll have more samples to share tomorrow. Right now, Ziggy the Cat, keeps trying to walk across my laptop. Earlier she was just toooo fascinated with the Flower Soft so I had to put it away.

Thanks for stopping by and hope you had a real good day! Yeah, tomorrow's Friday!

Wednesday, March 17, 2010

Hot off the Press!

Yeah! It's finally here! The Handcrafted Leis and Flowers Book Volume 8 by Ben Franklin Crafts arrived in the stores yesterday.


Just in time for Easter, Administrative Professional's Day, Mothers' Day and of course, Graduation!There are 20 individual projects, plus information on different lei variations. We've included a lot of leis that people have often requested over the years, like the Deluxe Braided Lei which allows you to use 3 colors of ribbon.


Thanks for stopping by today and I hope you're enjoying your week!

Tuesday, March 16, 2010

Not Just for Kids!

Trafiic is lighter...hmmm must be Spring Break! Well, if your keiki are looking for something to do,here's an idea. 3-D puzzles. They come in a variety of designs like motorcycles, planes and of course, animals. A good beginner one is this butterfly. You can paint it up anyway you want, add some glitter, possibilities are endless!


Or how about a good 'ol dinosaur? There's a couple of different ones to choose from.These two made up samples were "spocked" at the Pearl City BFC and made by their staff.


But these puzzles are not just for kids, they make great Father's Day gifts and centerpieces. especially this Koi for a yakudoshi!


Or, in two years, it'll be the Year of the Dragon!


The wood puzzles come in sheets and you need to punch out the pieces. You can lightly sand any rough edges. I made the Koi when we first got these in and here's my tip for puzzles with a lot of pieces. The instruction sheet has a replica drawing of the sheets of wood with each piece numbered. Either go through and number each wood piece in pencil or keep the wood sheets intact and punch out the pieces as you need them. This will help keep your pieces organized because some pieces are very similar in size. The best part is it doesn't require gluing!

So, instead of being puzzled on what to do to keep busy, make a 3-D puzzle!
Thanks for stopping by today and I hope you're all enjoying Spring Break!