http://www.blogger.com/

Wednesday, February 5, 2014

14 Days of Valentines - Day 5

Today is the fifth day in this series of 14 Days of Valentines. Yesterday, I used Plarn to tie up one of the gift card holders. So, you ask what is Plarn? Well, today is your lucky day, we're going to make a Plarn-ation!
Okay, I made that word up. We're going to make a carnation flower from Plarn, which is like a yarn made from plastic that's super strong. A Plarnation would be great for outdoor decorations and fun for Graduations, too. They are simple to make. Choose your color of Plarn, it comes in 6 colors: White, Red, Pink, Blue, Yellow and Green. I'm going to use two colors, the red and pink.

It's going to be just like making a pom pom. Take a piece of sturdy cardboard about 3" wide. First, wrap the pink plarn in the middle of the cardboard about 20 times.

Then, take the red plarn and wrap it around the cardboard left to right about 80 times.

I took  12" of the red plarn and slid it under one side of the wrapped plarn, like when you make a pom pom.

Tie the piece of plarn up, bundling the wrapped plarn. Tie it  as tight as you can and knot it two times to secure. Slide the cardboard out.

Cut apart all of the loops of plarn.

The pink plarn should be in the center,  just to give it some contrast. You can even trim this section shorter to make it stand out more. Shape the flower by fluffing the strands and trimming the ends as needed.

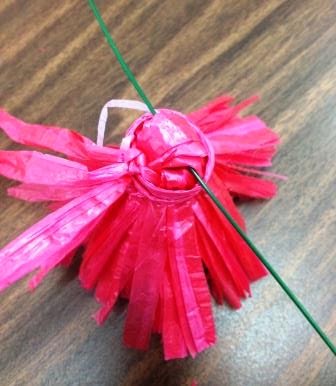
Take a 12" length of the red plarn and wrap around the bottom, tie securely.

Slip an 18 gauge floral wire through the bottom of the bundle. Fold the wire in half for the stem.

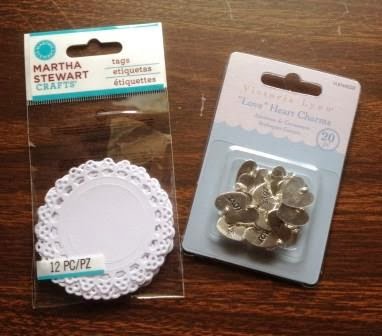
Place 5 satin leaves along the bottom to make a calyx. Glue in place, slightly overlapping each other.

Wrap up the stem with floral tape. Start the floral tape about 1" below the calyx. Wrap upwards to the calyx. Then, work your way back down to the end of the stem. Remember that you need to pull the floral tape slightly as you wrap to release the adhesive in the tape.
You can add leaves to the stem as you wrap it with the floral tape.

Fluff and shape the "plarnation" until you're happy with it. One roll of plarn can make a lot of flowers!

Although roses are generally associated with Valentine's Day, carnations always have a special place in my heart for that day. In my sophomore year (our first year of high school), my group of friends included four girls (my besties!) plus a couple of guys. We always hung out together and none of us were "couples". But on Valentine's Day, the guys surprised us! They each gave us girls a single stem rose and some carnation stems. It must've made them broke going to the florist near our school! So, we carried our flowers around all day, class to class. It was really sweet of them to make us all feel so special! Carnations take me back to those sweet memories.

Thank you for stopping by today and I hope your week is going great!

Tuesday, February 4, 2014

14 Days of Valentines - Day 4

Today, I'll share project 4 of the 14 Days of Valentines. We're going to play with one of my new favorite toys, the We R Memory Keepers Envelope Punch Board!

Besides making envelopes for greeting cards, this tool helps you whip up Gift Card holders really fast. It's a really great project for scraps or those cute 6 x 6 paper pads.

Basic instructions are printed right on the board. So, for my gift card holders, I'll need a 5" x 5" paper.

I'm going to use some papers that aren't "Valentine's Day" but they have that feel in their designs.

The instructions say to line up the edge at the "2" mark.

I press down that big blue button which is the punch for the corners of the envelopes. Next, you score using the scorer that comes with the board.

You rotate the paper counter clockwise and line up the first scored line with the point protruding from the punch towards the left. Score the next side. Repeat until all sides are scored and punched.

It should look like this.

If you want to round the points, turn the board around and place your corner into the other side of the punch. Punch down to round the points.

Here's the rounded point.

Fold up at the scored lines. Fold in the sides and use tape or glue dots.  Fold up the bottom to make the envelope.

I used some Martha Stewart mini doilies and some metal "love" tags from the wedding department to embellish.

I slipped in a Ben Franklin Crafts gift card.

I decided to tie up the gift card holder with baker's twine and tied on the "love" tag.

I used Plarn to tie up this holder.
 
These mini gift card holders are also the perfect size for tiny love notes. You can also just fold them up an tie it closed,  that way they can open up completely and reveal your secret message!

Hope you're having fun with these simple heart felt projects. Thanks for stopping by on this rainy and soggy day!Happy Crafting!


Monday, February 3, 2014

14 days of Valentines - Day 3 Funny Little Valentine!

Welcome back! Today's project, the third in the 14 Days of Valentines, is for the fun at heart!

It's time to make some Happy feet!

Start with an inexpensive pair of rubber slippers.

Grab some balloons. I chose red, white and pink to match our Valentine's theme. I separated all of the balloons into two piles and laid them out in a color repeat pattern.

Then, I started from the middle and tied a balloon onto the strap.

Then, I continued to tie all of the balloons onto the strap. One pile of balloons per slipper.

Look how fun these pair of slippers are now! You need to be careful, because someone may leave your house with them because they are so crazy fun! I once made a pair using an assorted color pack of smaller water bomb balloons. It was a fun summer wearing those slippers around. This is an easy project for kids to do, too!

Thanks for stopping by today and I hope I spock some balloon slippers around town! LOL!

Sunday, February 2, 2014

14 Days of Valentines - Day 2

Welcome Back! It's Super Bowl Sunday, which for me means a great time to craft. Occasionally, I watch the game and cheer for a team but usually I just like watching the commercials! LOL!

So, for Day 2, I'm sharing a project that Beth from Mapunapuna Ben Franklin Crafts will show you how to make on tonight's Joy of Crafting Show. I call it the Framed Scripted Heart.

Beth created her own heart cut out to use as a stencil. She placed it over the black cardstock and used a white ink pen to write words of love in the cutout area. When she removed the stencil, it left a wonderful scripted heart. For a special effect, she re-traced the words in Glossy Accents to make the heart standout even more.

What a great idea for anytime of the year, not just Valentine's day.

Thanks for stopping by today and scroll down to my earlier post to find out more about tonight's show. Happy Crafting!

February's first Joy of Crafting Show

Wow! It's already February! The weather sure has been making me feel like it's winter time! And the rain has been great for staying home and crafting. Well, on this show we have some very fun crafts that will surely brighten your day!

The show opens with two great guys! Milton Fujii, our show's Executive Producer teaches our special guest, Derek Kurisu of Big Island's KTA Super Stores and "Living in Paradise" TV show, how to make a Hearty Clay Rose!

Then, Derek shares a craft food project with me and Milton. He helps us make some Hot Cocoa Cones, perfect for this wintery weather we've been having.

Next, Beth Murphy of Mapunapuna Ben Franklin Crafts makes her "Joy of Crafting" debut with a super special project. Beth shows us how to create a personalized project, the Framed Scripted Heart.

Lastly, I get you back to basics with a simple origami box. It's perfect for using your scrapbook paper stash and it's just the right size for many gifts.

Thanks for stopping by today! Hope you're enjoying the weekend!

Saturday, February 1, 2014

14 Days of Valentine's - Day 1 Punch Art Card

Hello February! Last year, I did 14 Days of Valentine's projects and I decided to do it again this year! To refresh your memory, these are the projects I shared last year ...

 
I know you only count 13 projects because on Valentine's Day, I asked what was everyone's favorite project?! A lot of people picked as their favorites the Message in a Bottle, the Origami Heart and the Wire Wrapped Heart ring. Then, I randomly chose 3 comments and gave those people a Ben Franklin Crafts gift card. I plan to do the same thing this year!
 
You can read more about last year's projects beginning from Day One here.
 
So, for this year's first project I have a punch art project, hope you like it!
 
Most of the punches used are Marvy Uchida Clever Lever punches unless specified. Start with the 2.5" Oval - Pink and punch out an oval in white cardstock  and one in black cardstock. Take the white oval and slip it back into the punch and punch out a section on each side, as shown.
 
Next, take EK Success 5/16" circle punch and punch two circles on a scrap piece of white cardstock.

Now, take the Clever Lever 1/2" circle punch - Orange, and position over the 5/16" holes as shown and punch out. These are your eyes.

Take the 2" Oval - Blue punch and punch out two ovals from black cardstock. Keep one on the side for the body.
Slip the other oval back into the punch as shown and punch a skinny oval. Cut this piece in half for the ears.

Take the 5/16" punch and punch out one circle from pink cardstock for the nose. Assemble all of the punched pieces and glue as shown. The black from the head will show through to create the eyes. Use the white Galaxy Marker to make a dot in the eyes for highlights.

Take the 2" Oval - Blue punch and punch out one oval from white cardstock. Use a scissors to trim off a section along the top. Glue onto the body for the "back stripe".

Slip the same white oval back into the punch as shown and punch out a slight teardrop shape for the chest. Glue in place.

Use the Small Oval - Orange punch and punch out four ovals from black cardstock for the paws. This is not shown, but use the 1.5" Heart - Yellow punch and punch one heart from red cardstock. Use a black marker to write "Be Mine" on the heart.

Use the 2.5" Oval - Pink punch and punch out one oval from white cardstock and one from black cardstock. Place the black oval back into the punch and punch out a skinny oval. Do the same with the white oval, but make it smaller. Layer the white onto the black and glue. This is the tail.

Assemble all the pieces together to make your skunk. I have two small black ovals at the bottom for the feet and the two other small ovals are the paws holding the heart. I placed the skunk on the front of a card and used stickers to write" UR so Stinkin' Cute!"

Thanks for stopping by today! Hope you're enjoying the weekend! See you tomorrow for another heart-felt project!

Friday, January 31, 2014

Happy Year of the Horse!

Today is Chinese New Year and it's the Year of the Horse! My brother, his wife, my other brother's wife and my nephew's wife are just a few of the Horsies that I know. We're also expecting another Horsie in a few weeks! So, exciting!

So, here's my Chinese New Year story:
Me: Bryan, do you celebrate Chinese New Year?
Bryan: No, do you?
Me: No, I'm not Chinese.
Bryan: Uh...Neither am I.
Me: What? ...Oh, you're Korean!?
Bryan: Yeah, my Dad is Korean (grinning at me)

So, my wonderful friend who does the camerawork and produces our show is Bryan Lee. We're a great team because we balance each other. He's more on the quiet side, always smiling. Me, well, let's just say Bryan's gotten used to my craziness! Wow, and all this time I thought he was at least part Chinese. So, funny! So, goes to show you, you may be good friends with someone but there's always something new to learn! Anyway, he's not a Horse.


But for all of you who are Horses, here's my dandelion design Horse to wish you a great and Happy Year of the Horse! I added it to a checkbook cover, hoping for a prosperous year! Kung Hee Fat Choy!

Thanks for stopping by today! Tomorrow is February and I'll be starting my 14 Days of Valentine's projects again! Have a great weekend!