http://www.blogger.com/

Thursday, February 14, 2013

14 Days of Valentines - Day 11 LOVE Note book

Besides the people in your life, I'm pretty sure I know what else you love! You love to craft! That's why you're here, right? Well, like me you probably have a million ideas running through your head. So, I decided I needed a place to write it all down, especially when I'm on the go.

So, here's a fast and easy, but personal notebook.

I took one of the RTD blank notebooks, very inexpensive at only a  $1.00! Took some of my leftover paper from cardmaking.

First, I measured the height of the book, which came to 5 5/8". Cut my paper 5 5/8" x 12" to make it easy. Wrapped the paper around the outside of the book and into the front inside cover. Creased the edges.

I covered the blank book with strips of double-sided tape. Notice the extra tape where the book will fold over? This is so that the cover paper doesn't shift. I expect to open this book and fold over pages a LOT! Placed the paper on and taped it down to the book.

The reason I wrapped the paper into the front inside cover was so that I could make a pocket. Folded the paper at an angle and trimmed some off.


Folded the edge over for contrast and taped it down. Then I taped the inside cover along the sides and bottom to create a pocket.

I saved the triangle piece I cut off and folded it into a corner bookmark!
 
Now, I can mark my last page!

Next, I decorated the front cover with more scraps, stickers and a rub-on. Easy peasy!

All set to write and sketch ideas! Thanks for stopping by today and I hope you have a wonderful week!

14 Days of Valentines - Day 10 Color of Love?

When I think of Love, I don't only think about red or pink. Love is Happy and to me that's bright yellow! So, today's project is something that can be given anytime of the year, it's a "just because" project.

Start with a clay pot, Styrofoam ball, small flower bush and a photo/card holder found in the wedding department. Or, you can take wire and make your own.

Place the Styrofoam ball in the pot.
 
Break or cut off bunches of flowers leaving a little stem at the bottom.
 
Take the flowers and stick them into the Styrofoam ball, covering it all over.

Stick the silver wire photo holder somewhere amongst the flowers. Add a photo, note or a pre-printed message like I did. DONE!

You can always add more embellishments like tie a ribbon around the pot, paint the pot, add butterflies or lady bugs. And you can use this for birthdays, Professional Admin Day, Mother's day, whatever you can think of. Go Spread the Love!

Thanks for stopping by today and Happy Crafting!

14 Days of Valentines - Day 9 - On the Wall

Time to declare your love and display it for all to see!

This is a super fast project that you can use your scraps with.

I used some everyday paper so it doesn't look too Valentine-sy for the rest of the year. Got some ink for distressing the edges.

I was going for a simple look, so I used these unfinished wood pieces.

I started with an unfinished wood plaque that already had some holes drilled through for the hanger.

Cut the paper to fit the top of the plaque, distressed it with ink and taped it down. Cut out a "bingo" card from the Sn@p collection and did the same.

Added my man, heart and woman wood pieces.

Then, for a more earthy look, used the hemp cord for the hanger. DONE! As I said, I was going for simple.

Thanks for stopping by today and have a great weekend!

Monday, February 11, 2013

14 Days of Valentine's - Day 8 Origami Heart

The weekend is here so you might be eating out. Let's spread a little Love this year by leaving Heart shaped tips!
Fold a dollar bill into a heart and leave this the next time you eat out or want to thank someone for a job well done!

It's not hard because the folds are repetitive. Here'a a link to a project sheet, the paper size is the same as a dollar bill.

Have fun practicing! Thanks for stopping by today and have a great weekend!

14 Days of Valentine's - Day 7 More Treats!

After making that ring yesterday, I think we need more treats!
This is a simple project that uses Sizzix Framelit dies, clear treat bag, rub-ons, ribbon and a stapler.

Here's a link to the project sheet. It's fast and easy so you can make a bunch for all of your friends and family!

Thanks, for stopping by today and hope you're having a great week!

14 Days of Valentine's - Day 6 Heart Ring

You've already made some treats for family and friends, so now, it's time to make something for yourself!
Here's a simple heart shape ring that's easy to make.
 
Start with some jewelry wire. I'm using 16 gauge silver wire with a copper base from Bead Smith. If you are making smaller rings you may want to use a thinner wire like 18 or 20 gauge.

I started with about 8" of wire because I want to have room to play when I'm shaping the heart. Not quite in the middle of the wire, I started to shape my heart.

I was tempted to wrap the bottom of the heart first, but since that's easy to do, I learned it's easier to shape the ring first.

Use a ring mandrel if you have one, or use what you have like a dowel or in my case, a glue stick, to start the shaping of the ring. Use your pliers to bend the wire to keep the heart shape, then bring the rest of wire around to the top of the heart. Remove from your "mandrel" and fit to your finger, leaving a little extra room.

Wrap the end of the wire around the top of the heart a couple of times. Cut the end of the wire shorter to make it easier to wrap. Cut the excess wire off with a flush cutter. Use your chain nose pliers to push the cut end closer to the wrap so it doesn't snag you.

Now, wrap the other end around the bottom of the heart. Cut the excess off with a flush cutter and use the chain nose to push the cut end closer to the wrap, again so it doesn't snag you.

You can shape the ring more by placing it on the mandrel and pressing it close to get a rounder shape.

Thank You for stopping by today and hope you're having a really sweet week!

14 Days of Valentine's Day 5 - LOVE Card

So, here we are on day 5 of the 14 Days of Valentine's. Time to make a card for someone special!

Here's a really fast card to make.To keep it simple, we used dies from the Sizzix Pop 'n Cuts line.

Here's the base Pop'n Cuts die with the "love" die insert.

And the matching Love Sizzlet set. The Love wording is the perfect match to the insert die and leaves just a tiny border.

From printed cardstock, I cut out a card without the insert for the base(left). Then, I put the insert in and cut out the card from solid cardstock (right). Follow the instructions on where to fold to create the pop out.
 
Then, I cut out part of the card base in the printed cardstock again. Flipped it over and cut out the "love" from the Sizzlet die.

I stamped the birdie design on white cardstock and cut him out. Ithink his heart wing matches the paper perfectly. I color in his wing with a marker. I also cut a few hearts from the printed cardstock.

I cut a strip from this cardstock for the front of the cars and I also used some of this silver glitter tape.

Here's the front of the card with a strip of the heart paper and two strips of silver glitter tape.

Attached the pop-out card to the inside. Glued the "love" onto the cardstock love pop out. Glued the heart paper pieces to the top and bottom of the card. Added a strip of glitter tape above the bottom heart paper piece. Added the cut out hearts. Added the stamped birdie to the top of the pop out using pop dots.

Thanks for stopping by today and I hope you're having a great week!


Tuesday, February 5, 2013

14 days of Valentine's Day 4 - Wall Art

Today is Day 4 of the 14 Days of Valentine's and my projects today are from this week's Joy of Crafting Show! So simple, just take a canvas and paint it up. Decorate some paper mache letters and glue them on! These projects are keepers all year long!

First sample, I call the Summer of Love. I used yellow and orange acrylic paint and painted strokes from the middle of the canvas outward. This creates a "sunburst" effect. Then,  I covered the 8" L-O-V-E with some cheerful patterend paper and painted the sides with orange paint. Glued the letters on the canvas and ta-dah! Doesn't it just radiate with Love?!
For the other LOVE sample, I painted the canvas with chalkboard paint. Then, I painted the 8"  L-O-V-E with red paint. The "U" is 12" tall and I painted the sides with red and covered the top of the letter using the metallic silver poster board. I wanted to use the chalkboard paint so that we can leave messages on the sides.

I'm really loving the paper mache letters because you can do so much with them. They come in 8", 12" and 23.5" tall. And they're on sale until this week Friday!

Thanks for stopping by today and I hope you have a LOVE-ly week!


14 Days of Valentine's - Day 3 More Treats!

Since today is Super Bowl Sunday, food is on everyone's mind, even if you don't watch the game! So, for Day 3, we have another treat holder!
This treat holder uses the 4.5" clear tubes. You can just make half a holder for three tubes or glue two together for a six-pack!Here's a link for the project sheet.

This treat holder I would make for my super special people. For Valentine's Day, fill it with red, pink and white candies. For graduation, you could fill it with school colors!

Okay, enjoy the Super Bowl and Happy Crafting!

14 Days of Valentine's - Day 2 Treat Holder

One of my favorite things to make for any holiday is something to put treats in. So, for day 2, we are going back in time to a past project that's fast and easy.

A simple treat holder that you can make for a lot of people, like your whole office. It's really great to make them all different by using up your scrap papers! Here's a link to the project sheet.

Thanks for stopping by today and Happy Crafting!

Sunday, February 3, 2013

First Joy of Crafting Show for February!

Tonight is the premiere of February's first show and we have some new crafts and a new friend!
 
I start the show with one of the hottest trends around, Letters! I'll show you a couple of sample projects using our new paper mache letters which comes in three sizes: 23.5", 12" and 8". The possibilities are endless! (Pssst...they are on sale until Friday, Feb. 8!)

Next, we welcome a new friend, Ruth Johnson of Kitty Bee Designs, one of Hawaii's creative stamp companies. Ruth uses one of her cow character stamps to adorn a chocolate filled box. You've got to check out all of her cute designs, now available at the Ben Franklin Crafts stores.

Then, we have Gloria from Pearl City BFC who shares the jewelry technique of Chain Maille which creates patterns using jump rings.

Gloria shows us how to do one of the basics, the Byzantine pattern. This is one of my favorites because it looks pretty cool without having to do a lot of work.

Thank You  for stopping by today and I hope you get a chance to catch the show. Have a great week!

Friday, February 1, 2013

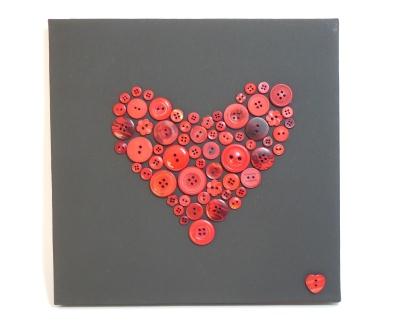
14 Days of Valentines - Day 1 Button Heart

Today is the first day for my 14 Days of Valentine's. So, I decided to start with a simple project that you could even do with your kids!
 

You just need a sturdy flat surface, so I chose a 10"x 10" black canvas.Then, you need some buttons, preferably red or pink, and some glue. You could use a glue gun, glue dots or just bottle glue.

Start placing your buttons on the canvas, forming a heart shape. Mix big and little ones and different shapes, too. If you flip the buttons, sometimes there's a different finish or design on the other side.

When you're happy, start gluing your buttons down.

 I just went to town gluing them down so my heart kind of changed it's shape. But that's okay, I still like it!

Thanks for stopping by and check back tomorrow for project #2! Have a great weekend!